

 Completed
High-speed wireless DAP debugger Lite
PRO High-speed wireless DAP debugger Lite
License
:GPL 3.0
Description
Unauthorized commercial use of this item is prohibited.
Authorized sales: Taobao-ABrobot Intelligence, Taobao-Tucker Innovation.
Two wireless debuggers have been open sourced, and you can choose according to cost and usage environment:
CH32 version: The cost is about 100 yuan. Under test conditions, 98KB/s wired download, 48KB/s wireless download, strong anti-WiFi interference ability, lower version keil is available.
https://oshwhub.com/ylj2000/dap_hs_wl_v0-4
ESP32 version: The cost is about 30-40 yuan. Under test conditions, 94KB/s wired download and 43KB/s wireless download. The ability to resist WiFi interference is average. A bad WiFi environment will cause download speed to decrease or even download to fail. However, it is unlikely to work for normal personal use. The impact is only greater in environments such as competition venues, and the keil version needs to be higher than 5.29.
https://oshwhub.com/ylj2000/dap_hs_esp_open
Change log
#2023.09.13
Update module version and corresponding shell.
#2023.09.01
Initial release.
1. Introduction
Usage environment: MDK>=5.29, IAR>=8.32.
The main chip only requires two pieces of ESP32-S3FN8 or ESP32-S3FH4R2. The BOM cost is about 30 yuan, and finished modules can also be used. The wireless performance is about twice that of the common wired FS+HID DAP, and even close to the wired STLink V2. The distance can reach more than 30m (further distance has not been tested, but there is no obvious speed attenuation).
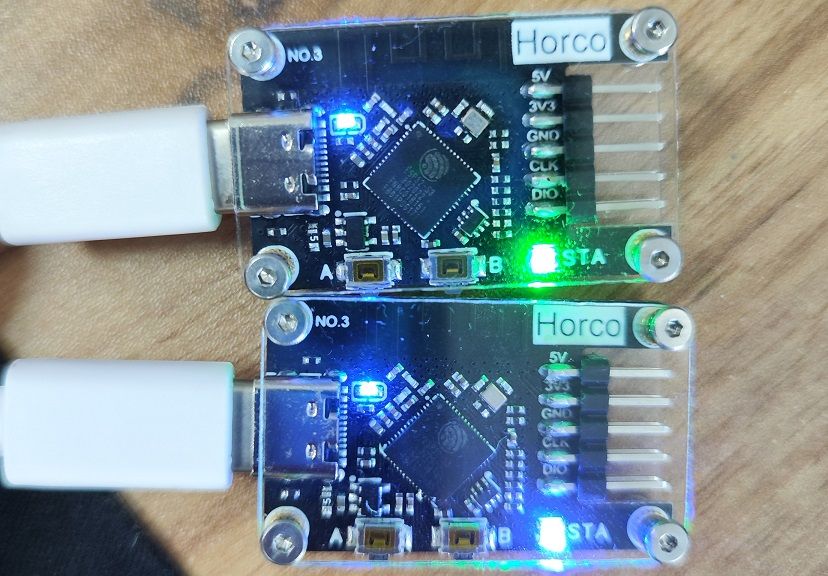
A wireless debugger is divided into a sending end (Host) and a receiving end (Slave). The software and hardware at both ends are completely the same. You can perform operations such as pairing, mode switching, and adjusting wireless channels through buttons. Like conventional DAP, it supports debugging ARM microcontrollers (such as STM32, GD32, etc.), supports SWD and JTAG, supports hardware reset and software reset, and supports virtual serial ports. After pairing, you can plug and play without installing drivers (WIN10 and above); it does not use WiFi protocol, but wireless similar to 2.4G, so there is no need to wait for wireless connection. In addition to wireless mode, you can also switch to wired mode (USB) to facilitate use in places with complex wireless environments. The performance will be better than wireless mode. The colors of different indicator lights represent different modes, red represents wired mode (USB), blue represents the wireless transmitter (Host), and green represents the wireless receiver (Slave).
2. Development Background
Currently, the most commonly used debuggers for debugging ARM microcontrollers include ST-link, J-Link, DAPLink, etc. Although their functions and speeds vary, almost all of them can only be connected to a USB cable. This is a problem in many debugging tasks that are dangerous. , such as robots, power supplies, etc., which can easily damage the computer or even injure yourself. Wireless debuggers can very well avoid these situations, and can optimize the debugging experience to a great extent. You no longer have to carry a computer, drag a USB cable, and follow the target everywhere.
Most of the wireless debuggers currently on the market are based on the CMSIS-DAP protocol, like DAPLink. However, there is a huge difference between performance and price. Many of them are sold at extremely high prices with low cost and extremely poor performance. They are actually very difficult to use, which has frustrated many developers, including myself. I have tried many wireless debuggers, and the only one that is relatively easy to use is the one from Zhengdian Atom, but the price is too expensive (300+) and unaffordable, so I decided to DIY a cheap and easy-to-use wireless debugger. In the previous open source, one has been developed based on CH32V307+SX1281, which costs less than 100 yuan, but its performance is comparable to punctual atoms. But the cost is still high, so we plan to develop a wireless debugger that is cheaper but still has enough performance for general use.
The performance of the previous version is roughly: MDK+STM32F4, Program speed wired 98KB/s, wireless 48KB/s. The initial target speed of this version is: wired is close to the previous version, wireless is about 30KB/s. To achieve this goal, HID mode DAP is not possible, so WinUSB-based Bulk mode must be used. For reasons of low cost, it is inevitable to choose a microcontroller with built-in USB and wireless. The initial consideration included ESP32-S2 and ESP32-S3, but in subsequent tests, ESP32-S2 took up too much CPU resources due to TinyUSB, causing the wired speed to only reach 40+KB/s; while ESP32- Because S3 is a dual-core design, after allocating tasks to two cores, the wired speed can reach more than 90KB/s. Therefore, although the price of S3 is higher, I still choose ESP32-S3.
After hardware design, software debugging and optimization, the final effect even exceeded the original design goal, reaching a speed very close to the previous version's 100 yuan configuration, while the cost of this version is only about 30 yuan. Program speed, wired 95KB/s, wireless up to about 45KB/s. Of course, since ESP uses a WiFi channel, it may actually decrease depending on the wireless environment, but it is generally around 40KB/s. This performance is also very close to the performance of the Punctual Atomic Wireless Debugger. What kind of bike do you want at one-tenth the price?
3. Finished Product Display


4. Production Process
1. PCB production: Make PCB according to open source files and select 1.0 board thickness.
2. PCB welding: Basically, the components used can be purchased at LC, or you can go to Aobao to find cheaper ones. The attached BOM contains a reference purchase link. It is recommended that you choose according to the situation.
3. Firmware download: After confirming that the PCBA is produced correctly, download the debugger firmware. Press and hold button A while connecting the debugger to the computer with a USB cable. Open the flash_download_tool in the attachment and select the following configuration. After entering the interface, select the firmware, set the starting address to 0, and select the corresponding serial port. It is recommended to click ERASE to erase the Flash first, and then click START to burn. After burning is completed, power on again. The default mode is USB mode (indicator light is red).


4. Pairing: Press and hold button B on the first module to power on until the indicator light turns purple and then let go. When the second module is powered on by pressing B, after the indicator light turns purple, the two modules instantly become the master (blue) and the slave (green) respectively. At this time, both ends have automatically set the communication parameters and modes, and can be changed by pressing buttons if necessary. After completion, the master and slave need to be powered on again.
5. Button function
Setting mode: Press and hold button A until the indicator light turns yellow. Short press button B to adjust to the desired mode according to the color of the indicator light. If you need to save the configuration to Flash, that is, keep the current configuration the next time you power on, press and hold button A until the indicator light turns yellow and flash, then short press button A to exit; if it is only for temporary use, do not save the configuration to Flash. Then directly press button A to exit.
Set wireless channel: Press and hold button B until the indicator light flashes. The color and number of flashes at this time indicate the current WiFi channel, green indicates 1-5, red indicates 6-10, and blue indicates channels 11-13. Short press button B to select the target channel, then long press button A until the indicator light turns yellow and flash, then short press button A to exit. The master and slave need to be set to the same channel respectively before they can communicate. After completion, the master and slave need to be powered on again.
6. Test: Test whether downloading, virtual serial port and other functions are normal.
5. Daily Use
1. Keil settings
If you are unable to connect or the connection is unstable, you can try lowering the clock frequency, replacing the connected DuPont cable, etc. In addition, some types of chips may not be able to be debugged normally at high clock frequencies (such as the HK32F030MF4P6 I have used ).


2. Interference
If you encounter severe signal interference on the current wireless channel, you can try changing a communication channel. Too strong interference will lead to reduced speed, unstable downloads, etc.
6. Performance Test
Environment: Keil MDK 5.34.
Target chip: STM32F407VGT6.
Firmware size: about 1024K.
Test method: Use a stopwatch on your mobile phone and take the average of three times.

Since Erase and Verify downloaders take almost the same amount of time during the download process, calculate the Program duration and speed that can reflect the download speed of the downloader.
CH32V307 in the table is the previous version, and ESP32-S3 is this version. It can be seen that the performance of this version of the debugger is very close to the previous version. The wired mode speed is slightly faster than Jlink V9, and the wireless mode speed is slightly lower than STLink V2. I have also tested some wireless debuggers from Moubao, and many of them have speeds of more than ten KB/s, but this is normal, because the speed of the ordinary version of wired DAP is only 20+KB/s.
If you are interested and want to know more, you can join the QQ group: 770979540 for communication and discussion.
Designed by ylj2000 (from OSHWHub)
Design Drawing
 Empty
Empty
Comment