

 Completed
ESP32-S3 Multifunctional Independent Secondary Screen [iCRT]
PRO ESP32-S3 Multifunctional Independent Secondary Screen [iCRT]
License
:GPL 3.0
Description
Demo video
Updated on 2024-1-22
The docking station is complete.
Multi-function secondary screen "iCRT" docking station - (oshwhub.com)
Everything is downloaded here, https://pan.baidu.com/s/19-CHRh_MAejMqFVaL9os6Q?pwd=e8y5
SMT pasted some boards, if you are interested, you can buy it directly in my workshop. https://gf.bilibili.com/item/detail/1105534080
About
The production of this iCRT originated from the previous game console project "Old Overlord Game Console".
Shortly after the console project was completed, I came across an old photo with a CRT monitor I had used before, and I missed it in particular.
It just so happened that Fusion360 was not proficient enough, and I wanted to take this opportunity to use it to practice surface modeling, so I opened this pit.
When I first got my hands on the 3D printed shell, my friends and I thought it looked good, and many people liked it, so we came up with the idea of adding a soul to it—the PCB and the program, and making it a stand-alone tool, not a display device. So sketching, boarding, welding, coding, re-changing, adding functions, and in the end, it has become the current "multi-functional sub-screen device that exhausts my current technical strength".
PS: The name iCRT comes from my son, who I used to call MiniCRT.
Function introduction
At present, iCRT includes the following functions:
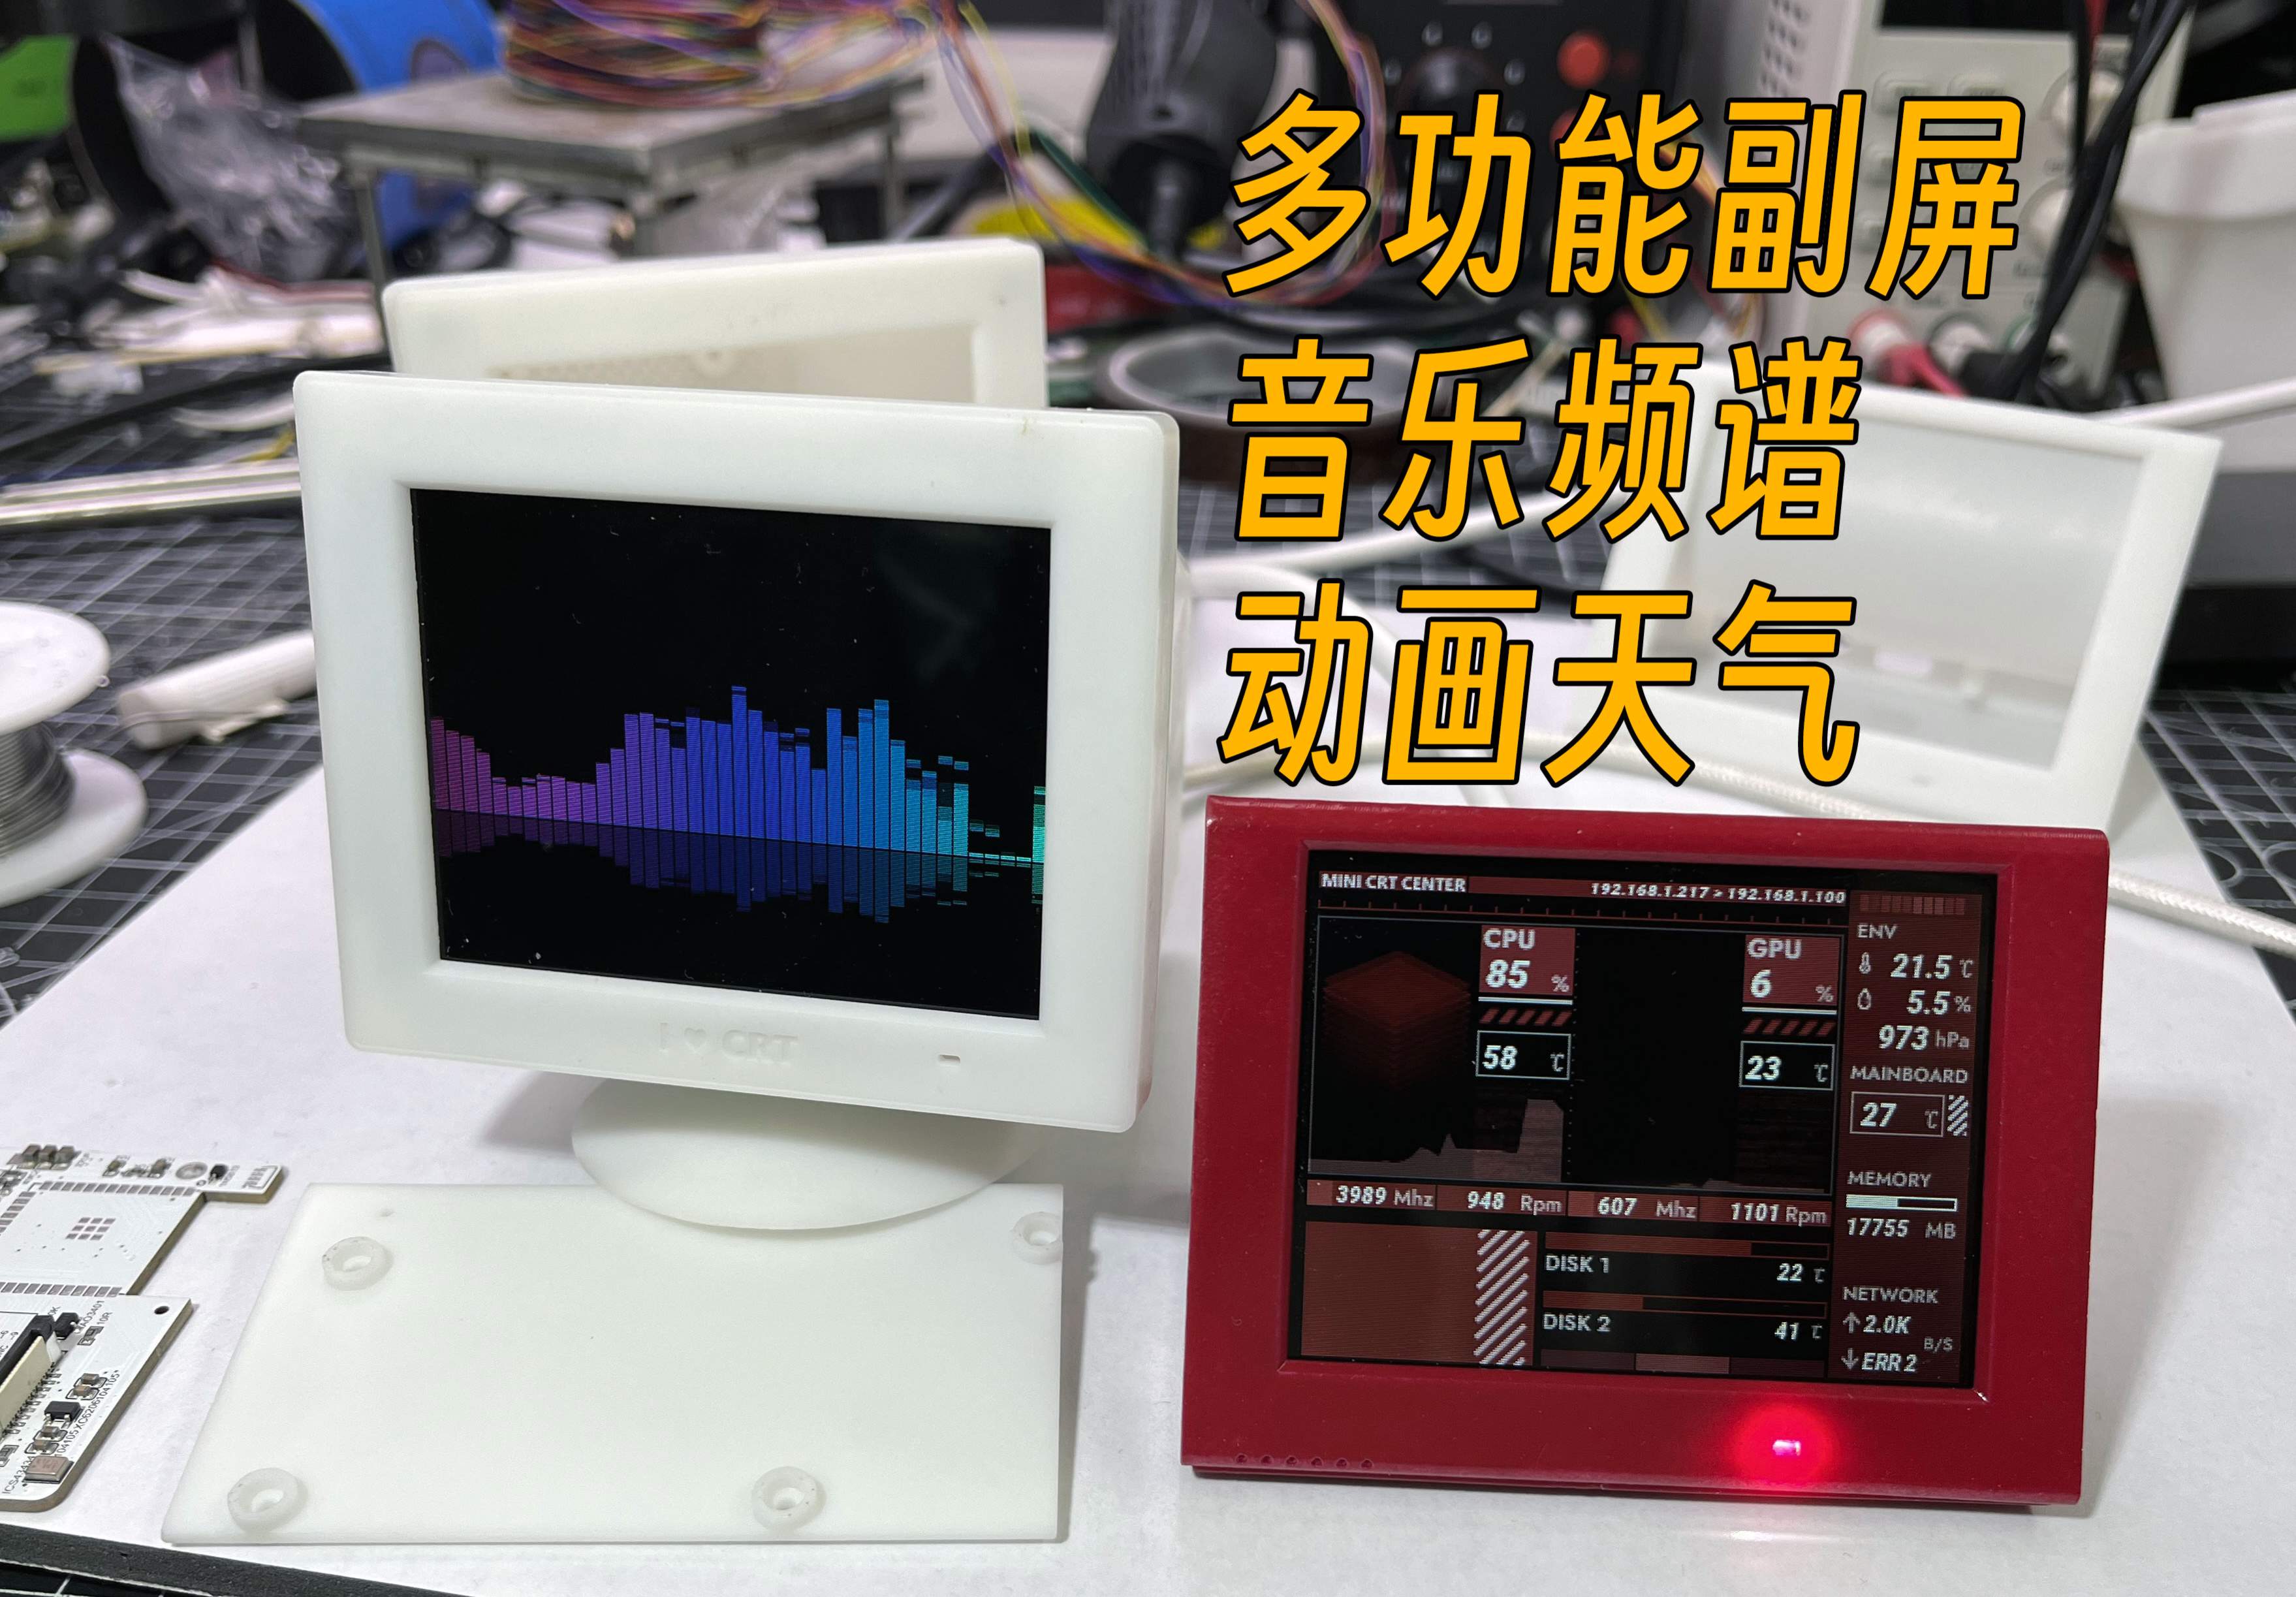
- AIDA64 secondary screen, implemented by RemotePanel, with animation effects of percentages and progress bars.
- The music spectrum beatmeter collects ambient sound through the internal microphone, performs FFT processing, real-time beat detection, and displays beautiful spectral effects and beat RGB lights.
- Dynamic weather clock, obtain weather information through AutoNavi map API, and read the corresponding dynamic effect as the background.
- Video playback, play pre-processed Mjpeg+Mp3 files, audio and picture synchronization.
- Picture display, showing JPEG file.
AIDA64 secondary screen
Let's popularize a little science about the current implementation methods of the secondary screen, and why iCRT is called an "independent" secondary screen.
The secondary screen is mainly used to display some information of the current computer, such as CPUGPU temperature, occupancy, frequency, etc., and some personalized elements will also be added, in short, it is a kind of dashboard feeling.
The main methods of implementation are:
- Extended Display: Connect the display device to the display interface of the computer, and then act as an extended display, extend the computer screen to that display, and move the AIDA64 instrument cluster to the extended screen.
The advantages are good effect, large screen, and strong performance;
The disadvantage (personally think) is that the extended display will occupy part of the graphics card performance, and will accidentally move the mouse to the extended screen, sometimes I don't know where the mouse goes, and I hate it when playing large games in full screen. - Independent Web Display: Through an independent peripheral, usually an Android machine, Raspberry Pi or other device that can access the web page and display, remotely access the web page provided by AIDA64 to display.
The advantage is that it does not affect the performance of the computer, and it is independent of the computer and can be placed elsewhere.
The disadvantage is that the RemotePanel web page provided by AIDA64 has limited display of special effects, and cannot display custom meters and animation effects. - Independent custom display: remote access to the data provided by AIDA64 (it can also be the data provided by the host computer written by yourself) through an independent peripheral, and display it according to your own style (this project)
The advantage is still that it does not affect the performance of the computer, and it is independent from the computer and can be placed elsewhere.
For this project, the disadvantage is that ESP32-S3 performance limitations, unable to display better and clearer effects and animations.
If it's a powerful Android secondary screen + someone to help you design the UI + someone to help you make an Android APP, that's the perfect secondary screen in my opinion. - Third-party peripherals: AIDA64 supports some third-party peripherals, such as some things from Logitech and Razer, which use custom protocols to transfer data.
The advantage should be the unique shape and the ability to fit with the device (unused)
Cons (unused)
This project obtains the information of AIDA64's RemotePanel, parses it, and displays it through its own UI.
Added unique gauge animations to CPU and GPU usage, and added a line chart effect over time.
Animation effects have also been added to the hard disk and memory usage.
In addition: the picture in the lower left corner can be changed by yourself to highlight the personality. It can be replaced directly on the web without the need for a card reader.
Music Spectrum Beatmeter
My favorite feature
I've always loved music visualization and music spectrum. In the past, I used a computer to collect audio for FFT and then sent the data to ESP32 for display, but this time I did it collect ambient sound in real time and then analyze and display it.
I have tried several kinds of microphones, some analog, some digital, and several digital ones, and this ICS43434 is currently the most effective, and of course the most expensive.
The real-time beat algorithm has changed several times, and it took a lot of time, and this is the best real-time beat detection I can do, which can be judged by the change of sound energy in a window period, and can adapt to most songs.
After detecting the beat, the RGB light will flash once, and the speaker and RGB light strip can be connected through the expansion port of the base, and these light strips can also flash simultaneously.
A dynamic gain algorithm has been added to the microphone capture, which dynamically increases or decreases the zoom ratio by judging the average sound intensity over a recent period of time, so as to achieve perfect spectral display and beat detection at any volume.
Dynamic weather clock
A long time ago, there was a mobile phone manufacturer called ham sausage (HTC), and when I saw his dynamic background on other people's phones, I was amazed and thought this is really cool.
This time I made a weather clock, and I thought it would be a dynamic background.
The weather animation for this project comes from the HTC SENSE weather animation found online. HTC's mobile phone business has also been stopped for many years, if HTC tells me that I can't use it, please let me know, I will delete it as soon as possible.
The weather is updated every 3-5 minutes, currently from my Gaode API, if you have an API, you can apply for it yourself and then fill in your own use.
When the weather changes, there will be a silky transition animation.
In terms of clocks, it includes the display of the Gregorian calendar and the lunar calendar, including the display of common holidays and the 24 solar terms.
Video playback
Maybe it can't be called video playback, ESP32-S3 is just an IoT-oriented microcontroller, there is no video codec function inside, even if it is JPEG decoding, it is only soft decoding.
The video playback of this project is to process the video as an MJPEG file + MP3 file, save it as the same main file name, and then copy it to the playback directory, and the device will decode and play it synchronously.
MJPEG must be 25 fps because it is 25 fps for audio and video synchronization.
The latest and fastest SIMD decoding used in MJPEG decoding is the fastest decoding that can be done on ESP32-S3, which is 50-80% faster than ordinary decoding libraries such as JPEGDEC.
Picture playback
Same as above, there is nothing to say, just play the picture.
That's all the features that iCRT has implemented so far.
Its positioning is an all-round secondary screen, desktop ornaments, and all the above functions are based on this need.
With its hardware, it is also possible to port the code of the previous old Overlord console and play FC games if necessary.
Plans for subsequent updates
Follow-up plan to join (i.e. dig a pit):
- Multi-city weather switching (convenient for you to see you and your TA)
- WeChat applet control (although the web and buttons can be controlled, but will the mobile phone control be more foreign?) )
- More AIDA64UI interface (this individual is not a design professional, and may need some design solutions from professionals)
- Separate MP3 playback? (This speaker is so frustrated that no one should want to use it to listen to songs, no, no, no...)
- Fabrication of the docking base. At present, the extension interface has been reserved. The docking station is planned to have bigger speakers, more RGB ambient lighting, and a USB 2.0 docking station. So it has one more function.
- Old Overlord game consoles. After having the docking station, you can use power through the docking station, and the existing USB port on the back can be connected to the controller to run game console programs.
Control methods
Control through the buttons on the back of the device: long press to call out and confirm the menu, short press to the next in the current function or the next item in the menu.
Control through the web: After the device is successfully configured, you can see the IP address of the device at the top of the AIDA64 interface, and enter the IP address in the browser to display the control page of the device, which is more convenient and flexible to control in this interface.
Distribution
When there is no Wi-Fi information, the device will turn on the configuration AP, the SSID is Crt-AP, and the password is 12345678.
After connecting, wait for a while and the network configuration page will automatically pop up, and automatically search for the WIFI hotspot in the current environment, select your network, enter the password, and wait for a while to complete the network configuration.
If the network changes and needs to be re-provisioned, you need to select "Clear WIFI Information" in the settings interface to clear it, so that the network configuration hotspot will be re-opened the next start-up.
Activation
This project took a lot of time, effort and not a lot of money.
Since CRT shell printing is more expensive, in order to facilitate DIY, I also spent a day building a cheap youth version of the shell open source for DIYers.
I don't want to rely on this and can't make money on it, but I also hope that the time I spend has a little value, and I can get recognition and like.
The 9.9 activation code (a cup of discounted Luckin) will use the firmware I wrote for a year, as well as new features that will be updated with my hobbies in the future.
If you are too lazy to do it, you can buy the finished product assembled by my SMT+.
I have a little dream that the things I make and the code I write can be liked by others, and at the same time, it can also help me realize the freedom of Luckin.
Hardware configuration
- MCU: ESP32-S3-N8R8
- Display: 3.2-inch 320×240 IPS SPI display (expensive)
- Storage: TF card, SDMMC 4Bit mode
- Audio playback: MAX98357 + normal small speaker
- Audio capture: ICS43434 DigitalI2S microphone
- Extra equipment: WS2812 lamp bead control
- USB: The USB interface supports reversible insertion, the forward plug is CH340X serial port, for burning equipment, and the reverse plug is ESP32-S3 comes with USB, which can be used as a HOST to connect the handle in the game console firmware.
- Shell: 3D resin printed retro CRT monitor shape (nostalgic version, expensive) and fashion desk calendar shape (youth version, cheap) two models.
Programming platform
IDE: platformio + arduino, 6.4.0, graphics framework is lvgl.
Open source
After thinking about it for a long time, I still chose to open source the PCB and the youth version of the shell, so that friends who want to do it themselves can also do it themselves.
One is because I can't forget the original intention of making things, and I want to share the interesting and fun things I make.
Second, because I promised that many group friends would open source content other than code.
Because the code took more than a year of effort before and after, and there are a lot of designs in it that I think are good, I really can't open source, forgive me.
The link will be updated after it is open sourced on the JLC.
Acknowledgement
Complete this project together in the mysterious treasure room (Bilibili), impermanence meow, etc., (good guy card) You are good people.
Instructions for making it
BOM
Directly export BOM in JLC, which has been adapted to the basic library as much as possible, and direct SMT can be used (I am SMT)
The purchase links for some of these originals are as follows:
| Screen, ST7789V plug-in IPS without touch | https://item.taobao.com/item.htm?spm=a1z09.2.0.0.758b2e8dl7yLYk&id=606752409953&_u=od53pk3b0b |
| ICS 43434 | https://item.taobao.com/item.htm?spm=a1z09.2.0.0.758b2e8dl7yLYk&id=696102320967&_u=od53pk4f88 |
| Vertical fpc, 18P | https://item.taobao.com/item.htm?spm=a1z09.2.0.0.758b2e8dl7yLYk&id=665810216667&_u=od53pk8afc |
| ch340x | https://detail.tmall.com/item.htm?id=724023996301&spm=a1z09.2.0.0.758b2e8dl7yLYk&_u=od53pkbac5 |
| Max98357 | https://item.taobao.com/item.htm?spm=a1z09.2.0.0.758b2e8dl7yLYk&id=719153151868&_u=od53pkf9c8 |
| Key 7MM high from the base to the handle | https://item.taobao.com/item.htm?spm=a1z09.2.0.0.5a8f2e8dyPZ3om&id=617002359193&_u=pd53pkd33d |
| Lamp beads | https://item.taobao.com/item.htm?spm=a1z09.2.0.0.5a8f2e8dyPZ3om&id=678219564054&_u=pd53pkc859 |
| AHT20 module | https://item.taobao.com/item.htm?spm=a1z09.2.0.0.418e2e8dybhkR1&id=746563131957&_u=pd53pk23b3 |
| Speaker (Youth Edition) 3020 cavity 4R3W-2P1.25 | https://item.taobao.com/item.htm?spm=a1z09.2.0.0.17fc2e8dr0xOtT&id=674903789729&_u=pd53pk0473 |
| Speaker (nostalgic version) XHXDZ-2840 plastic-4R 3W 3W | https://item.taobao.com/item.htm?spm=a1z09.2.0.0.17fc2e8dr0xOtT&id=23386844911&_u=pd53pkbe40 |
Note that if you don't want sound, you don't need to buy MAX98357 and speakers, and if you don't want an environmental sensor, don't buy AHT20 (this temperature is not very accurate, and what is displayed is actually the temperature of the module, which is a few degrees higher than the ambient temperature.)
If you want to save money exactly, you can also not buy CH340X, and USB reverse plugging is directly CDC flashing. (However, it will affect the subsequent controller connection that adapts to the firmware of the game console)
Module purchased for N8R8.
Weld
The soldering of this board is very simple (except for the MAX98357), pay attention to the temperature of the RGB lamp, and the direction of the vertical FPC socket, solder in the direction drawn on the PCB.
The pad at the bottom is the docking station, which is used to connect the horns and RGB light strips on the docking station, and the docking station will be updated later.
90% of the problems are caused by virtual soldering or tinning.
Burn
The USB plug is plugged in by CH340X, and the reverse plug is CDC, which can be burned. However, CDC cannot see the serial port information after burning, and the default serial port information comes out of the CH340X.
How can I tell if it's 340x or CDC currently? After plugging in, if there is 340 in the serial port name, it is 340x, and if there is none, it is CDC.
There are two types of firmware available, single-file version and upgraded version.
The single-file version is suitable for the first flash, and 0x0 the address is flashed, the contents will be cleared after flashing, including the activation code information. The single-file version has all three letters in its name.
The upgraded version is suitable for subsequent upgrades, and the settings inside will not be cleared after flashing to the address 0x10000.
Select ESP32-S3 for the flash tool, UART mode. SPI SPEED 80M, SPI MODE DIO, speed 921600.
The firmware can be downloaded from https://pan.baidu.com/s/19-CHRh_MAejMqFVaL9os6Q?pwd=e8y5 and found in the iCRT directory.
Debugging
After the burning is completed, the serial port should be able to see the startup information normally, if it can't be seen, it means that it is not soldered well.
Prepare a TF card, copy the directory in the directory structure provided in the network disk to the root directory of the TF card, plug it in, and you can see the picture and sound when you power it on (no sound means you haven't soldered 98357)
Please provide serial port information before seeking help.
Distribution
The AIDA64 secondary screen and weather clock of this device need to be used with network configuration.
After powering on, the device automatically turns on an AP named Crt-AP with a 12345678 password. Connect to this AP with your mobile phone, wait for a while, the network configuration page will pop up, automatically search for the hotspot in the current environment, select your hotspot and enter the password, and the network configuration can be completed.
Note: Once some mobile phones find that the hotspot cannot be connected to the Internet, they will automatically disconnect the hotspot to use the 5G network, and at this time they need to connect to the AP again. If the network configuration page does not pop up after connecting to the AP, enter 192.168.4.1 on the mobile browser.
Control
The device can be controlled by the buttons behind the back and through the web page.
Key control: Long press to call out the menu, OK. Short press for the next item.
Web control: Just click on the corresponding button.
In the web control, you can set the API KEY of AutoNavi Map (the default is mine), set the city code (the city code is the first 6 digits of the ID card in your area), and set the AIDA64 host address (that is, the IP address of your computer)
The activation function is also in the web control, after providing me with the machine code, the activation code will be entered, and the activation can be completed.
AIDA64
1. Find an activated AIDA64 client (by yourself)
2. Menu [File] [Settings] [LCD] and select Remote Sensor.
3. Port 80, fill in the resolution 1280×800 at will, and check [Enable RemoteSensor LCD support]
4. Click [LCD Project], click [Import] in the upper right corner, and then select the my_aida64_setting.rslcd file in my network disk.
5. After importing, you need to make some settings, because everyone's CPU, GPU, motherboard, hard disk, network card, etc. are different, please set them one by one.
6. Note that the text in the "Show Label" must not be modified, and the "Show unit" must be filled in with "^" (without quotation marks), otherwise the device will not be able to detect it.
7. Click OK after all the modifications are completed, and then minimize AIDA64. You can make it start automatically when you turn it on in the settings. (Settings, General, Running AIDA64 on Windows Startup)
8. Access the IP address of iCRT through the web page, set the IP address of your computer (that is, the IP of the computer running AIDA64) in the "host address of the secondary screen" at the bottom, and then save it.
If the local port 80 is occupied, you need to add a colon to the end and add a custom port.
For example
192.168.0.100 uses the host address of 192.168.0.100, default port 80.
192.168.0.100:9223 uses the host address of 192.168.0.100 and uses port 9223.
9. The firewall allows AIDA64 to access the network, or manually allow TCP80 port (or your custom port), important!
After the setting is completed, switch the iCRT to the AIDA64 function window to display the computer status information.
Music Spectrum
By default, the auto-gain feature is turned on, which means that the device dynamically adjusts the gain based on the volume to display a better spectral bar.
You can turn off the dynamic gain in the web page and fix it at a certain gain.
Listen to this awesome song next to it, trust me.。
Weather
You can use it by configuring the city code on the web page. If possible, you can also register your own AutoNavi API KEY and fill it in.
Temperature and humidity have two numbers, which represent the temperature and humidity of the sensors on the device, and the temperature and humidity of AutoNavi Weather.
The temperature of the device will exceed the current ambient temperature by a few degrees (this really can't be done, it has to heat up)
(The big moon is best seen at night on a sunny day)
MJPEG playback
After processing the video with the following FFMPEG command, rename it to my0.mjpeg my1.mjpeg.....etc., and copy it to the custom directory of the TF card. To synchronize audio playback, the name of the audio file should be the same as the name of the mjpeg file (my0.mp3, my1.mp3 ....)

Picture display
Rename the 320×240 JPEG file to p0.jpg p1.jpg p2.jpg and put it in the pic directory of the TF card.
Q&A
Q: I can't find the serial port
A: The multimeter checks whether the module is powered on normally to 3.3V, and also checks the power supply of the CH340 chip
Q: I can't flash the firmware
A: Same as above
Q: The screen is not lit up or the screen is blurred
A: Whether the cable is plugged in backwards and whether there is a backlight
Q: There is no sound or pop or white noise
A: This one is very difficult to solder, basically the 98357 chip is not soldered. Of course, if the device is muted in the settings, there will be no sound
Q: The TF card failed to be initialized
A: The card is broken or the directory is wrong
Q: The RGB lamp is not bright
A: The lamp beads are burned
Q: The microphone cannot capture audio
A: The bottom may be filled with tin
Q: I can't access AIDA64
A: Enter the IP address of the computer (computer) in the browser address of the computer, and see if you can open the AIDA64 web page, if not, it is likely that port 80 is occupied, please set other ports.
Designed by 萨纳兰的黄昏 (from OSHWHub)
a:https://oshwhub.com/planevina/esp32-s3-multi-function-independent-sub-screen-icrt
Design Drawing
 Empty
Empty
Comment