

 Completed
Dyson Ball RGB WiFi small light
PRO Dyson Ball RGB WiFi small light
License
:CC BY-NC-SA 4.0
Description
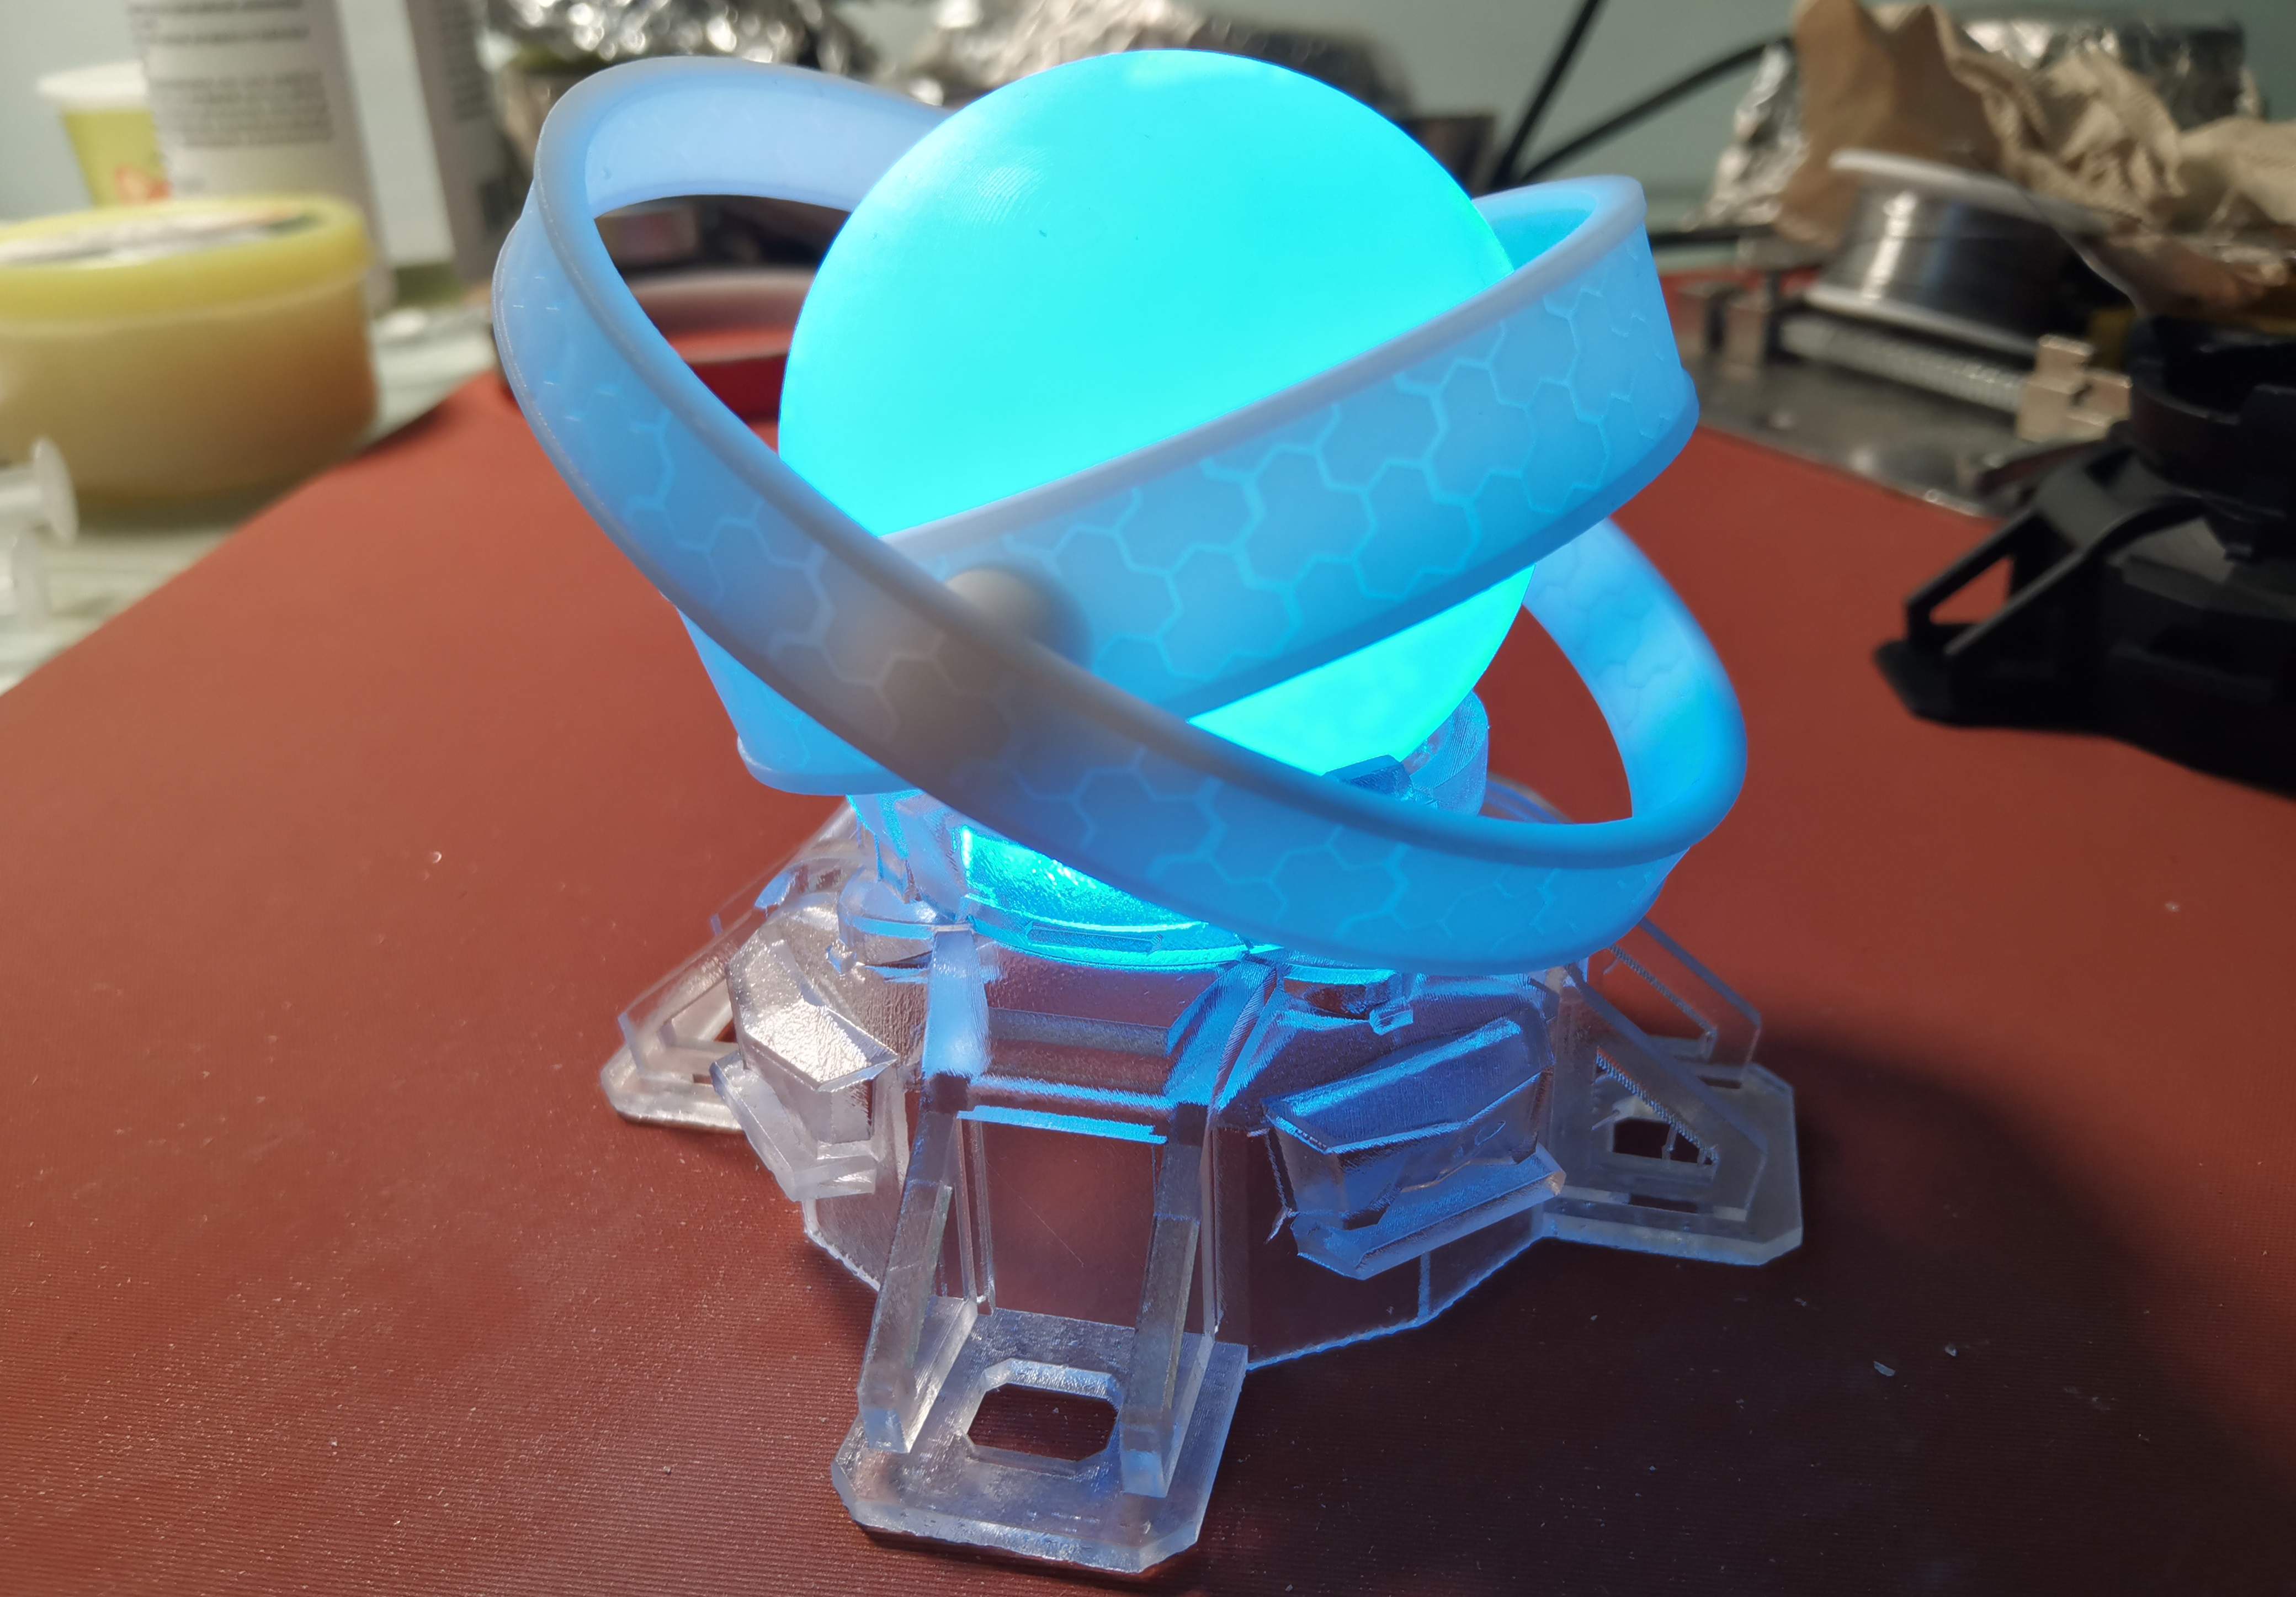
Effect display


Demo video
https://www.bilibili.com/video/BV1r94y1k71H/
Change log
20223/8/16: Added how to use WLED firmware
Reference purchase list
Pcb
Element
3D printed parts x2
M2 hexagonal nut x4
M2*7 round head screws
Reference tools & consumables:
Type-C data cable
Tweezers
Screwdriver
Glue (used to fix nuts to 3D printed parts, 502 is not recommended, the effect is not very good but it is not impossible to use)
Soldering iron
Solder wire
Gold finger tape
Solder paste (recommended for novices, it is recommended to buy low-temperature solder paste in a syringe)
Heat gun (recommended for novices)
Flux (recommended for novices, buy no-clean or BGA soldering oil, do not buy halogen-containing ones, which will conduct electricity)
Welding
All are 0805 packages, and it is not difficult to solder with a soldering iron.
However, the distance between components is relatively small. Newbies are advised to use solder paste + hot air gun for soldering. For solder paste, it is recommended to buy low-temperature solder paste in a syringe. The following uses solder paste + hot air gun as a demonstration, which can be used in conjunction with Bilibili's demonstration video: https:// www.bilibili.com/video/BV1r94y1k71H/
Apply solder paste on the front (it's okay if a small amount of solder paste overflows, it will shrink after heating)

Pendulum component (can be used with the attached welding assistant.html, you can see the component model and quantity, you can rotate and click on the component on the right side, and click on the left side to highlight all components of the same model)
Note that some components are directional:
WS2812B-B/W (the missing corner on the component corresponds to the small white triangle on the pcb)
SMF5.0A (the white line on the component corresponds to the white line on the PCB)
Resistor (black side with letters facing up)
CH340C (the white point on the component corresponds to the white point on the pcb)
What to do if the logo on the PCB is covered by solder paste and cannot be seen clearly: Switch the display mode on the soldering assistance web page to hide the components and see the PCB.


It is recommended that the pendulum components should be smaller first and then larger. Use tweezers to clamp the component onto the pad and press it gently. It doesn't matter if it is slightly crooked.

Then heat it with a hot air gun, and the low-temperature solder paste can be turned on at 250 degrees.

After cooling, use gold finger tape to fix the component to prevent it from falling off when the reverse side is heated.

Apply solder paste on the reverse side. For dense pads such as type-c and ch340c, just apply a strip directly.

Place the components (place the small ones first and then the big ones, pay attention to the directionality)

Heat gun heating.

You can see that the ch340c is connected to the tin, and the type-c is lucky, but the tin is not connected.
How to deal with soldering: Apply flux (it's okay if you apply more flux, it's not conductive, and it won't affect it if it overflows), and then use a soldering iron with a blade to drag it (video has a demonstration: https://www.bilibili.com/video/BV1r94y1k71H / )
If the type-c is connected with tin, the same operation is performed, but be careful not to let the flux flow into the interface. You can use tweezers to press the two depressions on the type-c to prevent the interface from moving, and then use a blade soldering iron to drag , do not weld for too long, otherwise the plastic of the interface may be burned.

Solder the four fixed pins of Type-C from the front of the board. The temperature of the soldering iron can be turned up a little higher. If you look at the back of the board, if there is tin flow, it means the soldering is firm.


Finally, tear off the glue and check to see if there are any other solder connections. If you see big tin beads, you can use tweezers to remove them. If you see small ones, don't worry about them.
If you have a multimeter, you can check whether the positive and negative terminals are short-circuited.
Burning program
Try burning the program first to avoid discovering problems after installation.
Download and install CH340 driver: https://www.wch.cn/downloads/CH341SER_EXE.html

Download ESP FLASH TOOL: https://docs.ai-thinker.com/esp_download
Unzip and run flash_download_tool_X.XXexe
Choose according to the picture

Select firmware
1: WLED (recommended, many functions)
Chinese firmware (recommended, machine translation, only Chinese common functions):
Download the attached d1_mini.bin
Official English firmware: https://github.com/Aircoookie/WLED/releases
Download WLED_X.X.X_ESP8266.bin
/*****
2: Blinker (fewer functions)
Download the attached blinker.bin file
*****/
Copy the path and paste it at the arrow location.
For example: C:\myFolder\XXX.bin

Others are set according to the picture (note that 0x0 is the number 0, not the letter O)

Use the data cable to connect the soldered board to the computer
Then select COM (usually there is only one, if there are more than one, you can see which one is the extra one after inserting it)
Select BAUD, directly to the maximum. If you make a mistake, you can adjust it smaller.

Click ERASE and wait for completion.

Then click start and wait for completion.

Reseat the board.
WLED firmware:
The presence of WLED-AP WiFi means that there is a high probability that there is no problem, and the orange light should still be on.
/*****
Blinker firmware:
If the lamp bead lights up red, it means there is a high probability that there is no problem.
*****/
Color
Post a rendering.

Assemble
There will be some liquid (ethyl acetate?) left after the 3D printed parts are received. You can wipe them lightly and then wash them with water and dry them.
Install the 4 nuts into the groove at the bottom of the ball and fix them with glue ( 502 is not recommended, the effect is not very good but it is not impossible to use)


Install the PCB onto the base, be careful not to install it upside down.

Align the 4 nut holes of the ball, the 4 holes of the base, and the holes of the PCB, and install the screws.


Due to design issues, the type-c hole is too small, so I used a utility knife to cut off a piece. The attached stl file has been enlarged, so there should be no need to cut it.

use
WLED firmware:
WiFi named WLED-AP
Pwd: wled1234
The configuration web page will automatically appear afterward.
Enter WiFi SETTINGS
Click Scan and select your WiFi in the Network name column (only 2.4G can be selected, and only 2.4G WiFi can be scanned)
Enter WiFi password (Network password)
Then save (Save&Connect)

Download WLED APP:
Github:https://github.com/Aircoookie/WLED-App/releases
APP Store:https://apps.apple.com/us/app/wled/id1475695033
Considering that some people don't know how to access Github, you can directly download the attached apk file.
Or directly enter the LAN IP of ESP8266 (can be found on the router management page, named wled-WLED)
Click the plus sign in the upper right corner of the APP (you can skip it if you access directly through IP)
Click DISCOVER LIGHTS...
Click the check mark after Found WLED! is displayed.
Click WLED to enter the usage page.
Click Config in the upper right corner (you can skip it if you use Chinese firmware)
Enter LED Preferences.
Change the length (Length) in the hardware setup (Hardware setup) to 4 and GPIO to 13.
Button 0 GPIO (Button 0 GPIO) is changed to unused or -1 (unused) and disabled (Disabled)
Change the Relay GPIO to 12 and check Invert.
Then save (Save) and return to the color palette page.
Click Power in the upper left corner twice to make sure Power is highlighted.
Then click on the color palette to display the colors normally.

Basic usage:
The sun slider above can be used to adjust the brightness.
The effects at the bottom can switch effects, and Solid is the default display mode.
After selecting an effect, you can slide down the Color page at the bottom to select the color of the effect.
Colors and effects are used together. Just pick a few and play with them and you will understand.
The slider bar at the bottom of the effects page allows you to adjust the speed and intensity of the effect.
/*****
Blinker firmware:
Download and register Blinker:https://diandeng.tech/dev
Add device>Independent device>Network access.
Then click on the three dots in the upper right corner of the new device> Interface configuration
Delete them all, and then paste the content (if you have any questions, you can download the attached txt file, which has the same content):
{¨version¨¨2.0.0¨¨config¨{¨headerColor¨¨transparent¨¨headerStyle¨¨light¨¨background¨{¨img¨´´}}¨dashboard¨|{¨type¨¨btn¨¨ico¨¨fad fa-lightbulb¨¨mode¨Ê¨t0¨´´¨t1¨¨文本2¨¨bg¨É¨cols¨Ë¨rows¨Ë¨key¨¨switch¨´x´Ê´y´Ñ¨lstyle¨É¨clr¨¨#595959¨}{ßA¨tim¨ßIÉßJËßKËßL¨timing¨´x´Î´y´Ñ}{ßA¨col¨ßF´´ßO¨#389BEE¨ßIËßJÏßKÏßL¨color¨´x´Ê´y´ÉßNË}{ßA¨ran¨ßF¨亮度¨ßOßT¨max¨¢1c¨min¨ÉßIÉßJÏßKÊßL¨luminance¨´x´Ê´y´¤AßNÎ}{ßA¨inp¨ßIËßJÑßKËßL¨inp-g0y¨´x´É´y´Ï}÷¨actions¨|¦¨cmd¨¦ßM‡¨text¨‡¨on¨¨关灯¨¨off¨¨开灯¨—÷¨triggers¨|÷¨rt¨|÷}
Update the configuration, then restart the software, you can see that there are components.

Click on the three dots in the upper right corner to copy the key.
Power on the board. After powering on, the red light will turn on, which means the distribution network is turned on.
Connect your mobile phone or computer to the ESP8266 distribution network_DSP_Light wifi.
The network configuration page will automatically open.

Enter the wifi name (can only connect to 2.4G WiFi), wifi password, blinker key, and save.
If the wifi connection is successful, the yellow light will flash, indicating that the mqtt server of blinker is being connected.
Wait until the yellow light turns solid and then you can control it in the blinker.
There is nothing to say about the color palette, switches, timing, and brightness. You will know after you try it yourself.
Usage of text input box:
Send hexadecimal color (need to add a pound sign, case insensitive): #ff00ff
Send RGB color (need to add brackets): (255,0,255)
*****/
Other questions
No sales are allowed in this project.
/*****
Blinker firmware:
How to re-configure the network/how to change the key or wifi/what to do if the key is entered incorrectly:
Method 1: Turn off the router. If you cannot connect to wifi, the distribution network will be automatically turned on.
Method 2: Short-circuit GPIO2 and GND with tweezers until the light turns red (it takes about ten seconds to short-circuit)
Method 3: Re-burn the firmware.
Keeps red light/cannot connect to wifi:
Can only connect to 2.4G WiFi, try again closer to the router.
Keeps flashing yellow light:
Check whether the network is normal.
The yellow light is always on but offline:
The device and the lamp need to be on the same LAN. Check whether the router prohibits communication between the devices.
*****/
Designed by Water_Block (from OSHWHub)
Link:https://oshwhub.com/rain623/dai-sen-qiu-RGBxiao-deng-Blinker
Design Drawing
 Empty
Empty
Comment