© 2024 EasyEDA Some rights reserved ISO/IEC
Editor Version
×
recommended

Pro Edition

 Brand new interactions and interfaces
 Smooth support for design sizes of over 3W
devices or 10W pads
 More rigorous design constraints, more
standardized processes
 For enterprises, more professional users


Std Edition
 Easy to use and quick to get started
 The process supports design scales of 300
devices or 1000 pads
 Supports simple circuit simulation
 For students, teachers, creators


Completed
PRO
 [Training camp]A dog with four feet
[Training camp]A dog with four feet
License
GPL 3.0
License: GPL 3.0Mode:
Mode
Editors' pickEditors' pick
- 0
Update time:
2024-12-05 09:23:47
Creation time:
2024-12-04 02:32:03
Description
Description
1. Development board design
The first time I used Hi3861, I didn't dare to make it too complicated (I saw that there was a great god on the MPU6050), I decided to design it in the way of a general development board, except for the PCA9685 is necessary, the rest is just to lead out the general pins, add RX, TX indicators, in addition, increase the BUILD_IN_LED of GPIO13 pins, in order to facilitate program debugging and verification.
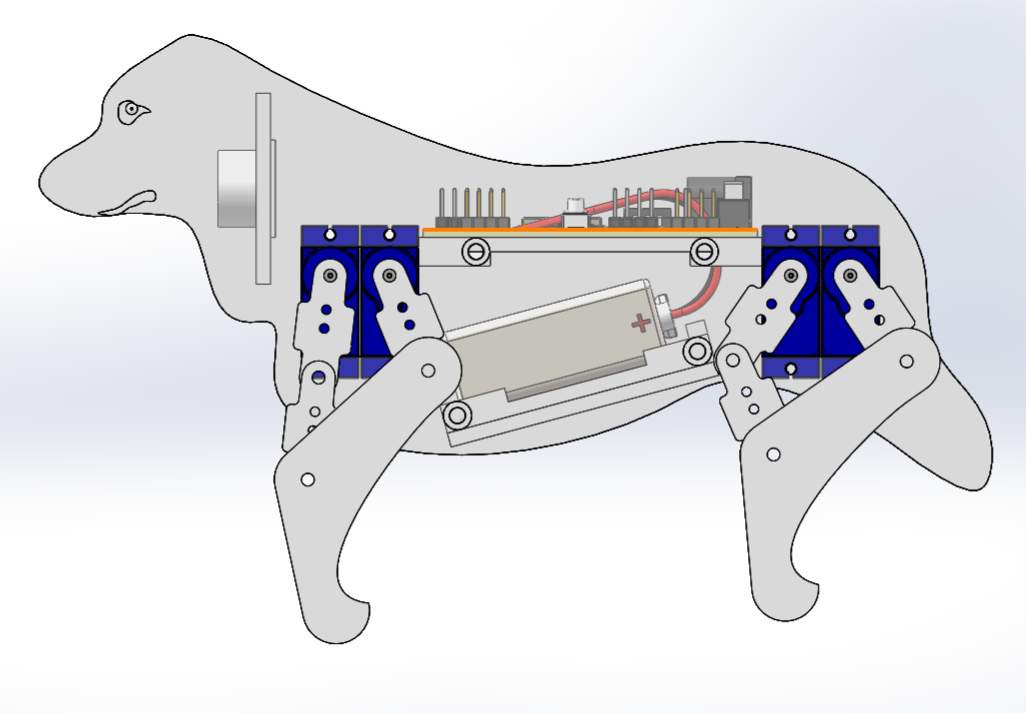
2. Shape and structure design
Shape:
How to design the shape to be more like a dog? First of all, you need to have a dog (which can be accessed directly from the Internet), such as:

Then, create a new SOLIDWORK part and insert a sketch in the front face. Then ...Tools - Sketch Tools - Sketch Image, insert the above diagram

Scale the size to what you see fit.
Then, use polylines to trace the shape.

Then draw the mounting holes of the servo (note that the position of the upper joint of the dog's foot should be roughly equivalent to the installation position of the servo), so that the shape is designed.

Structure:
The structure is basically done according to the size given by the training camp, but the connectors, especially the joints, cannot be simply strung with screws, so it is difficult to adjust the tightness of the joints.
Therefore, each joint is matched with a shaft hole, the length of the shaft is convex by 0.2, and the diameter of the hole is 0.2 larger than the shaft.

For other connections, the method of embedded nuts is used to ensure that the structure is firm.

3. PCB production

After the firmware was successfully burned, the I2C communication error was found, and after checking for half a day, it was found that the SDA was short-circuited to the ground, and the 3.3V was normal after cleaning the solder joints again, and the fault was eliminated. I saw that many students in the group also had this problem, usually because the SDA and SCL were not pulled up correctly (under normal circumstances, the measurement should be 3.3V).
4.Program burning
The program burning is mainly done step by step according to the process of the training camp video, and there are many holes in the process, such as can not use the WIN7 system, can not install too high version of PYCHARM, don't struggle with the installation of CLION under LINUX, directly use the original editor, don't change the firmware by yourself at the beginning, directly use the firmware provided by the training camp.
5.Assembly and commissioning
The printing accuracy of PLA is really not flattering, and each part has to be re-polished by itself.
What it looks like after assembly:

6.The operation effect
See attached MP4.
Designed by ybchen2005 (from OSHWHub)
Design Drawing
Design Drawing
schematic diagram
(
1
/
)
PCB
(
1
/
)
The preview image was not generated, please save it again in the
editor.
Related Projects
Change a batch
Loading...
Comment
Add to album
×
Loading...
reminder
×
Do you need to add this project to the album?


