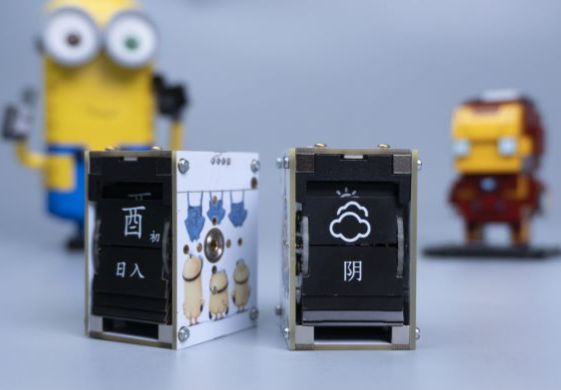
## Project Description
![DSC01798.jpg](//image.lceda.cn/pullimage/YvAyj0k8JO4PC59t3BtFqTMy9ZpXJVUZCRZ4F4pT.jpeg)
This is a single page turning clock based on the ESP32-PICO-D4 design, its main feature is the use of motor built-in structure, small size, and knot Most of the components are PCB, the whole does not use a line, very simple.
#### Open source files
- PCB Engineering (JLC EDA Professional Edition)
- 3D printing files (stl)
- [Program source code (esp-idf-v4.4)](https://github.com/DaqoLee/K_Clock.git)
- Parts BOM list
## Open source agreement
This project is under the GPL3.0 license. The software used and modified is also open source under the GPL license, and the copyright information of the original author is retained.
## Project related functions
**There are currently two versions:**
- Twenty-four hours: esp system time + sntp correction time
- Weather forecast: Data source: [Xinzhiwei](https://www.seniverse.com/)
## Project properties
This project is made public for the first time and is my original project. The project has not won any awards in other competitions.
## Project progress
This project has implemented basic functions and can accurately display time and weather information.
## Design principles
### 3D model
![微信截图_20230615184917.png](//image.lceda.cn/pullimage/Y79ClGA7JuBpnbq2m5JRbpK1mMYQvJhb6cC1J6pF.png)
The characteristic of this structure is to use PCB as the frame, the motor is built in, and the blade roller is designed into a sliding ring to realize the 360 degree rotation of the motor.The advantage of this design is the high space utilization rate, which makes the structure more compact.The disadvantage is the high cost, not easy to assemble and maintain.
![微信截图_20230615184628.png](//image.lceda.cn/pullimage/8DpLIG9kMOKFT5XWknaxtki2d71NkWaK3Umxlz0Y.png)
### Structural parts
PCB used for the entire structure.
![IMG_20230615_172628.jpg](//image.lceda.cn/pullimage/udKmg7gi9Qe3UoIPyvkkLHEvpU01rfSKJwxBWjZz.jpeg)
**Blade**
The PCB thickness of the 24-piece version is 0.8mm (a bit overkill). Of course, you can also use panel printing. If it is a 60-piece version, the thickness needs to be ≤0.5mm.
![微信截图_20230616080442.png](//image.lceda.cn/pullimage/mKrkmtmLn2fxYqcDV8ffvJwUxnoOcVl0vmlgo9vQ.png)
![微信截图_20230616080403.png](//image.lceda.cn/pullimage/0ucqOZeCmRUEK1XmDHnHSK943zO4khz3OqsSOTJY.png)
**Twenty-four hour comparison table**
![999.jpg](//image.easyeda.com/pullimage/uJDIWEb97b1dzMSKbp8I8HplGmUGYHlieisXIcSu.jpeg)
The characteristic of this structure is to use PCB as the frame, the motor is built in, and the blade roller is designed into a sliding ring to realize the 360 degree rotation of the motor.
The advantage of this design is the high space utilization rate, which makes the structure more compact.The disadvantage is the high cost, not easy to assemble and maintain.
**Twenty-four hours**
![微信截图_20230615195644.png](//image.lceda.cn/pullimage/XSvLNqrikxiJFub4YkpotZaA14cf2p1cLbDGdk2Z.png)
![微信截图_20230615195941.png](//image.lceda.cn/pullimage/Jz80ICKbQ0g5c3KFtGunz9dqrIKSfXLzi2ciK1lO.png)
**Weather icon**
![微信截图_20230615200713.png](//image.lceda.cn/pullimage/3YXmNm9zI2ruB5alOIVU9bzR4ldffQG2imVfCrCR.png)
![微信截图_20230615200555.png](//image.lceda.cn/pullimage/eoz3qcwtrKhwWWvv6LWzIBs4wHNYpdqcRrMNSvRe.png)
#### Main control&base panel&side panel
![微信截图_20230616082647.png](//image.lceda.cn/pullimage/AgEUd7tNDuiXaSU4XLHPIwKheNRmDNooRv5fhcfL.png)
**Main components:**
- Main control chip: ESP32-PICO-D4
- Motor driver: TMC2209
- Wireless charging: BQ51013B (this version has overturned and is temporarily unavailable)
- Lithium battery charging: TP4065
- 5V voltage regulator chip: TPS63002
**At present, the wireless charging of the bottom plate can not be used, the switch circuit also needs to be improved, and other functions are normal.Because neither the program nor the hardware considers low power consumption, the battery won't last long.The test standby current is about 10 mA, and the motor running current is about 200 mA. It is recommended to plug in.**
The main control and base board have been mounted on Jialichuang SMT
![IMG_20230615_173302.jpg](//image.lceda.cn/pullimage/XYoRFnVLNOUikEc1N6PraPWNm4Hg8o93IH7JTW0o.jpeg)
Only need to repair the welding wire posts and female headers.
![IMG_20230615_173358.jpg](//image.lceda.cn/pullimage/YuIPzEvTpVbWBIZMNM1p0u1doeM1QGZ4vqAwAQHK.jpeg)
The main control and side panels use color silk screen printing, and the PCB thickness is only 1.6mm.
![IMG_20230615_172925.jpg](//image.lceda.cn/pullimage/VjSlBrLFXj9W0C8TY71DiZp4DmVpLgpTNNF7CJ4y.jpeg)
It should be noted here that the spring thimble passes through the back of the PCB and is not affixed to the surface.The goal is to choose a larger trip to improve fault tolerance.
![IMG_20230616_111006.jpg](//image.lceda.cn/pullimage/jovNkTbcdwfkjfIaMtRM8SZmx2ukqwbClQUuqsNq.jpeg)
#### Blade roller
The blade roller (slip ring) is available in 24/60 versions, with a thickness of 1.6mm
![微信截图_20230616103233.png](//image.lceda.cn/pullimage/NSckZ5Z3OeR1dLbvjbWx5VCkdj23oZ2Ke0hMKo7X.png)
Each slip ring PCB is connected to one phase (two lines in A / B) and then connected to the contact through four copper columns.Two slip ring PCB to rotate 180 degrees connection.The motor and the sliding ring are connected by spring needle and contact. After welding the motor with the connected PCB (thickness 0.8mm) must be fixed with hot melt adhesive, otherwise it is easy to damage the motor.In addition to the basic components, there are some terminals, spring thimble (POGOPIN), welded copper sleeve will be given behind the BOM table.
![IMG_20230616_105608.jpg](//image.lceda.cn/pullimage/MfFTxkZLxZ430k059qqF1hs43Rdwgw0S3v2uP37p.jpeg)
The motor chosen is the GM15BY permanent magnet stepper motor. It is recommended to buy the version with a reduction ratio of 100 or more, no wire welding, and a shaft length of 4.4/5mm.
![IMG_20230615_173543.jpg](//image.lceda.cn/pullimage/nOnKbjL2BseO1VrJJ7btvpY0ls2QqYbEBvkfgfCS.jpeg)
![下载.png](//image.lceda.cn/pullimage/IL4tsKgGRh1HprzOHSWZFhWDyvupVYivTe3Stxzr.png)
Because the blade PCB is relatively hard and difficult to deform, you need to print a part to assist in assembling the blade, and then assemble it in sequence.
![微信截图_20230616113354.png](//image.lceda.cn/pullimage/s7wFBHBMQ8HEUx0EDe5J34pcrnLrPEnpNNGYEyse.png)
![微信截图_20230616113526.png](//image.lceda.cn/pullimage/hFz8rAnlXxMMcpczdr4wDYYNstTgUyWXC72gqFj4.png)
![Snipaste_2023-06-16_11-41-46.png](//image.lceda.cn/pullimage/N6U5KWzF5FMT5jtUd9cbdpzv5kWKYqzKdvAe93Nw.png)
![微信截图_20230616114244.png](//image.lceda.cn/pullimage/iExxQMsdWABaPwAwA1AHYhIe9J6ycNWKPEOALf5N.png)
![Snipaste_2023-06-16_11-45-49.png](//image.lceda.cn/pullimage/jrwxt1eXJ6fVN589o3A2qbuRQjtzp3OSdDPR76xv.png)![Snipaste_2023-06-16_11-46-40.png](//image.lceda.cn/pullimage/6FPhtDC3FKdWXearbgOiDQ09A95OsK4B4Kn2lo8w.png)
#### Device BOM
Name | Parameter | Quantity | Quantity |
--- | --- | --- | --- |
|GM15BY reduction stepper motor | Shaft length 4.4mm, reduction ratio 1:150 |1 | [stepper motor](https://item.taobao.com/item.htm?spm=a1z09.2.0.0.7c902e8dM8tzXP&id=543899450393&_u=d1r0amg7ebef) |
POGOPIN spring thimble | M102 (2 * 4.6)| 10 | [spring thimble](https://item.taobao.com/item.htm?spm=a1z09.2.0.0.2a3d2e8dWj0rYe&id=625464084733&_u=g1r0amg7f117) |
M2 copper pillar | 24mm | 4 | [copper pillar](https://detail.tmall.com/item.htm?_u=g1r0amg7569f&id=594046864224&spm=a1z09.2.0.0.2a3d2e8dWj0rYe) |
PCB square copper terminal block | 5*5*5 flat bottom | 8 | [Square terminal block](https://item.taobao.com/item.htm?spm=a1z09.2.0.0.2a3d2e8dWj0rYe&id=614073950829&_u=g1r0amg7fd07) |
SMT surface mount copper pillar| ¢3 * ¢5 * 3 + ¢4 * 1.6 | 1 | [SMD copper pillar](https://item.taobao.com/item.htm?spm=a1z09.2.0.0.2a3d2e8dWj0rYe&id=680807959486&_u=g1r0amg743e1) |
Rib bearing | 5 * 8 * 2.5 | 1 | [Bearing](https://detail.tmall.com/item.htm?_u=g1r0amg729bd&id=611878216362&spm=a1z09.2.0.0.2a3d2e8dWj0rYe) |
pogopin connector | 4P side welding male socket |1 | [connector](https://item.taobao.com/item.htm?spm=a1z09.2.0.0.2a3d2e8dWj0rYe&id=42066325628&_u=g1r0amg7065c) |
Screw | M1.6 * 4、M2 * 4、M2.5 * 4 | 50 | [Screw](https://item.taobao.com/item.htm?spm=a1z09.2.0.0.2a3d2e8dWj0rYe&id=40328525933&_u=g1r0amg7cb57) |
## Software Description
The program is relatively simple. There are already many open source codes for network clocks on the Internet. Just change the display part to control the stepper motor.
![1010.jpg](//image.easyeda.com/pullimage/25PCPlQXGnkOSIpQcKwkroLegFLEkkYbKA4q59ya.jpeg)
I have encapsulated the code a little bit. To change different blades, you only need to modify a few parameters.
```
void ClockTask(void *arg)
{
EventBits_t uxBits;
Clock_config_t clockConfig = {
.wifiConfig = {
.sta = {
"ssid", //ssid
"password", // password
.bssid_set = false,
}
},
.ntpUrl = "ntp.aliyun.com",
.userKey = "userKey", //心知天气userKey
.location = "guangzhou",
.powerPin = GPIO_NUM_4,
.pages = 24, //number of blades
.ntpInterval = 30,//Network calibration interval/minute
.speed = 2000, // Motor Speed
.compensation = 1000, //Step error compensation
.stepperConfig = {
.stepPin = 27,
.dirPin = 26,
.enPin = 25,
.ms1Pin = 14, // subdivision control
.ms2Pin = 12, //
.timer_group = TIMER_GROUP_0,
.timer_idx = TIMER_1,
.miStep = MICROSTEP_16, //Motor drive subdivision
.stepAngle = 0.086//0.086 0.12 Stepping Angle of the stepper motor after deceleration
}
};
Clock1.config(&clockConfig);
Clock1.init();
vTaskDelay(1000/portTICK_PERIOD_MS);
Clock1.runPages(Clock1.getTimeHour());
//Clock1.runPages(Clock1.getWeatherCode());
while (1)
{
uxBits = xEventGroupWaitBits(
clock_event_group,
SNTP_BIT | BTNJUMP_BIT | BTNLONG_BIT,
pdTRUE,
pdFALSE,
60000/portTICK_PERIOD_MS );//60000/portTICK_PERIOD_MS portMAX_DELAY
if(uxBits & SNTP_BIT)//Time calibration event
{
//Clock1.runPages(Clock1.getWeatherCode());
//Clock1.runPages(Clock1.getTimeHour());
}
else if (uxBits & BTNJUMP_BIT)//Press the key to change/release
{
Clock1.runInf(200); //Press the fine-tuning time
}
else if (uxBits & BTNLONG_BIT)//ButtonMedia Hold
{
Clock1.powerOFF();//Long press off
}
else //The maximum wait time is refreshed once a minute.
{
Clock1.runPages(Clock1.getTimeHour());
}
}
}
```
Source link:[https://github.com/DaqoLee/K_Clock.git](https://github.com/DaqoLee/K_Clock.git)
## Physical Display
### Physical Picture
![DSC01791.jpg](//image.lceda.cn/pullimage/ORpvLAV85zjMvTsmOXkgB5730mSOafOCr0LBcVxn.jpeg)
### Introduction video
[[Open Source] DIY Super Mini Page Flip Clock](https://www.bilibili.com/video/BV1Uo4y1A714/?share_source=copy_web&vd_source=05a706bbfb8a2b3090007f78f1cede0c)
## Other
### Dig a hole
The single-body version is mainly to verify the structure. Now the double-body version is on the way, so stay tuned.
![IMG_20230615_175053.jpg](//image.lceda.cn/pullimage/SwxkjJ7prqxD28FJbG3ME0j8BpwSZkqylYg27KVx.jpeg)
![IMG_20230615_175303.jpg](//image.lceda.cn/pullimage/MchN3E6EHxU6OstUXgXrRVtYsN3JXUnsQfCVxnDL.jpeg)
![微信截图_20230616150707.png](//image.lceda.cn/pullimage/rcT4o9FCtPHBOK5WZwvnL9Jx3SuUnYwXBzRUpgOh.png)