

 Completed
RGBWW full color fill light V2.0
PRO RGBWW full color fill light V2.0
License
:GPL 3.0
Description
Previous version, https://oshwhub.com/47415Y/rgbww-bu-guang-deng
After months of mental exhaustion, this time the previous pit was filled.
1) Hardware part
With STM32F051C8T6 MCUs, you can choose them when you have inventory on hand.

MCU power supply. Because of the use of lithium battery, considering the voltage drop, the 3.0V LDO with enable is used for power supply, which is convenient to control the power supply of the whole machine.
The same circuit as the previous small flashlight.
When SW1 is pressed, EN is high, LDO is on, POW-KEY is high, and the MCU can turn on when it detects it, and at the same time control the POW_EN high level self-locking.
After powering on, SW1 can be used as a normal button. When plugged into the USB, the VUSB is powered on and the power is also turned on.
When the power is off, the control POW_EN low level can be completely turned off.

24C02 Simple recording of setting data and battery data.

Simple buttons, and drive piezo buzzer.

The reference voltage is 1.25V, which is related to voltage and temperature measurement. AD-T1 is the NTC temperature on the light board.

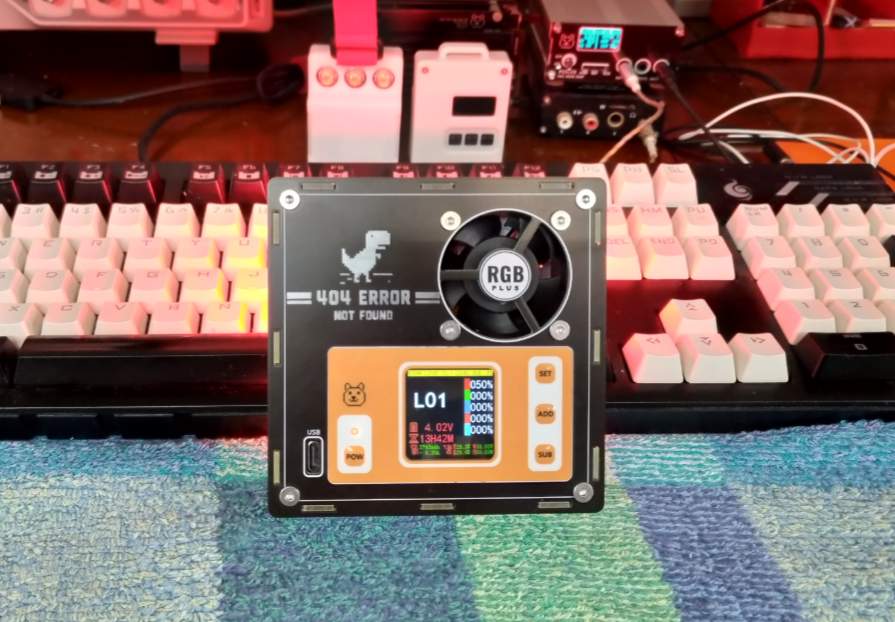
The 1.44 "color screen LCD2 was used, while the universal color screen package LCD1 was painted. (1.33 "12PIN welded ST7789 240*240 TB common screen).

The LED light board uses 8 strings of LEDs, and the driver part is still using a SGM3732 boost constant current driver, which has the advantage of starting from a very low brightness.
Due to the use of fill lights, it must not be flickering.

For the charging part, IP5306 is used, 2A charging. IP3005 lithium battery protection IC with a maximum current of 7A.

In the current detection part, the same INA199A1 as the small flashlight is used to detect the current of the battery. The magnification is 50x.
The REF of the INA199 is connected to a 1.25V reference voltage generated by the TL432 and the current VBAT->BAT+ is charged with an output voltage of 1.25V+(5mR/I)×50.
The BAT+->VBAT output voltage is 1.25V-(5mR/I)×50 during discharge, which allows bidirectional currents to be detected. to count the battery.
Q1, Q3 back-to-back PMOS can switch the power supply mode (to prevent backfilling), when the battery power supply is Q3 on, Q1 off, the battery power drive part.
When plugged into the USB, Q1 turns on, Q3 turns off, and the USB directly powers the drive part.

Fan drive, when the temperature of the light board is too high>50 degrees, control to turn on the fan.
In this case, the MT3608 is used to boost the voltage required to the fan (4.8V), and due to the characteristics of the BOOST circuit, when EN is low, the voltage will pass directly through L7 D6, so Q5 is required to completely turn off the voltage.
PS: The fan can use 4010 or 4020 12V 5V, you can adjust the voltage to reduce the noise.

The light board interface uses a 1.0mm 16PIN PFC cable with sufficient current.

The light board uses 2835 LED lamp beads.
RGB is 4 parallel 8 strings, 0.5W each. Note the encapsulation of the red lamp beads. The positive and negative poles are reversed.
Mall No. C2843878,C2843880,C2843879.
Cool white, warm white use high color rendering lamp beads RA95, a single 0.2W. 8 strings and 8 sums.
Marketplace number C516131,C516134.


----------------------------------------------------------------------------------------------
For the shell part, the PCB is used to make the shell.

The panel uses a PCB plus a bulging button panel printed by JLC Group, which happened to participate in the first batch of public testing, and the effect feels good.
Touch the button to use, C843636, 6*6*7.5 100gf feel is just right.
The USB socket is used, C2686965 the TYPE-C vertical female connector.
The battery socket uses the XT30 to meet the current needs.

----------------------------------------------------------------------------------------------
2)Software Section
Use STM32CubeMX to generate partial initialization code.
DMA is used for AD conversion, and hardware SPI is used for screen drivers.
Two sets of timers are used, and 6 hardware PWMs are used. 5 control LEDs, one control buzzer.
The main program is processed in a loop, and AD data - power state management - screen display.

Buttons, battery level statistics, LED brightness changes, buzzers, are all handled in the timer interrupt.

----------------------------------------------------------------------------------------------
Keystroke logic
1) Press and hold the POWER button to power on, press and hold the SET button to power on and initialize the EEPROM data.
2) On page 1-2-3, press and hold the POWER button to power off.
3) Press and hold the SET button to switch between page 1, RGBWW mode 2, free mode 3, flashing, gradient... 4, detailed gear setting 5, system setting.
4) On page 1-2-3, short press the ADD/SUB button to switch the mode, and then press the SET button to toggle the RGBWC setting (ADD/SUB to increase and decrease the value).
5) On page 4, press the SET button to move the cursor up and down, press the POWER button to move the cursor left and right, and ADD/SUB to increase and decrease the value.
6) On page 5, press the SET button, move the cursor up and down, and ADD/SUB to increase and decrease the value.
----------------------------------------------------------------------------------------------


----------------------------------------------------------------------------------------------
Finally, thanks for watching, and I wish you all peace.
Designed by ZGMT (from OSHWHub)
Design Drawing
 Empty
Empty
Comment