

 Completed
Mini Christmas tree based on WS2812
PRO Mini Christmas tree based on WS2812
License
:CC BY-NC-SA 3.0
Description
Project Description
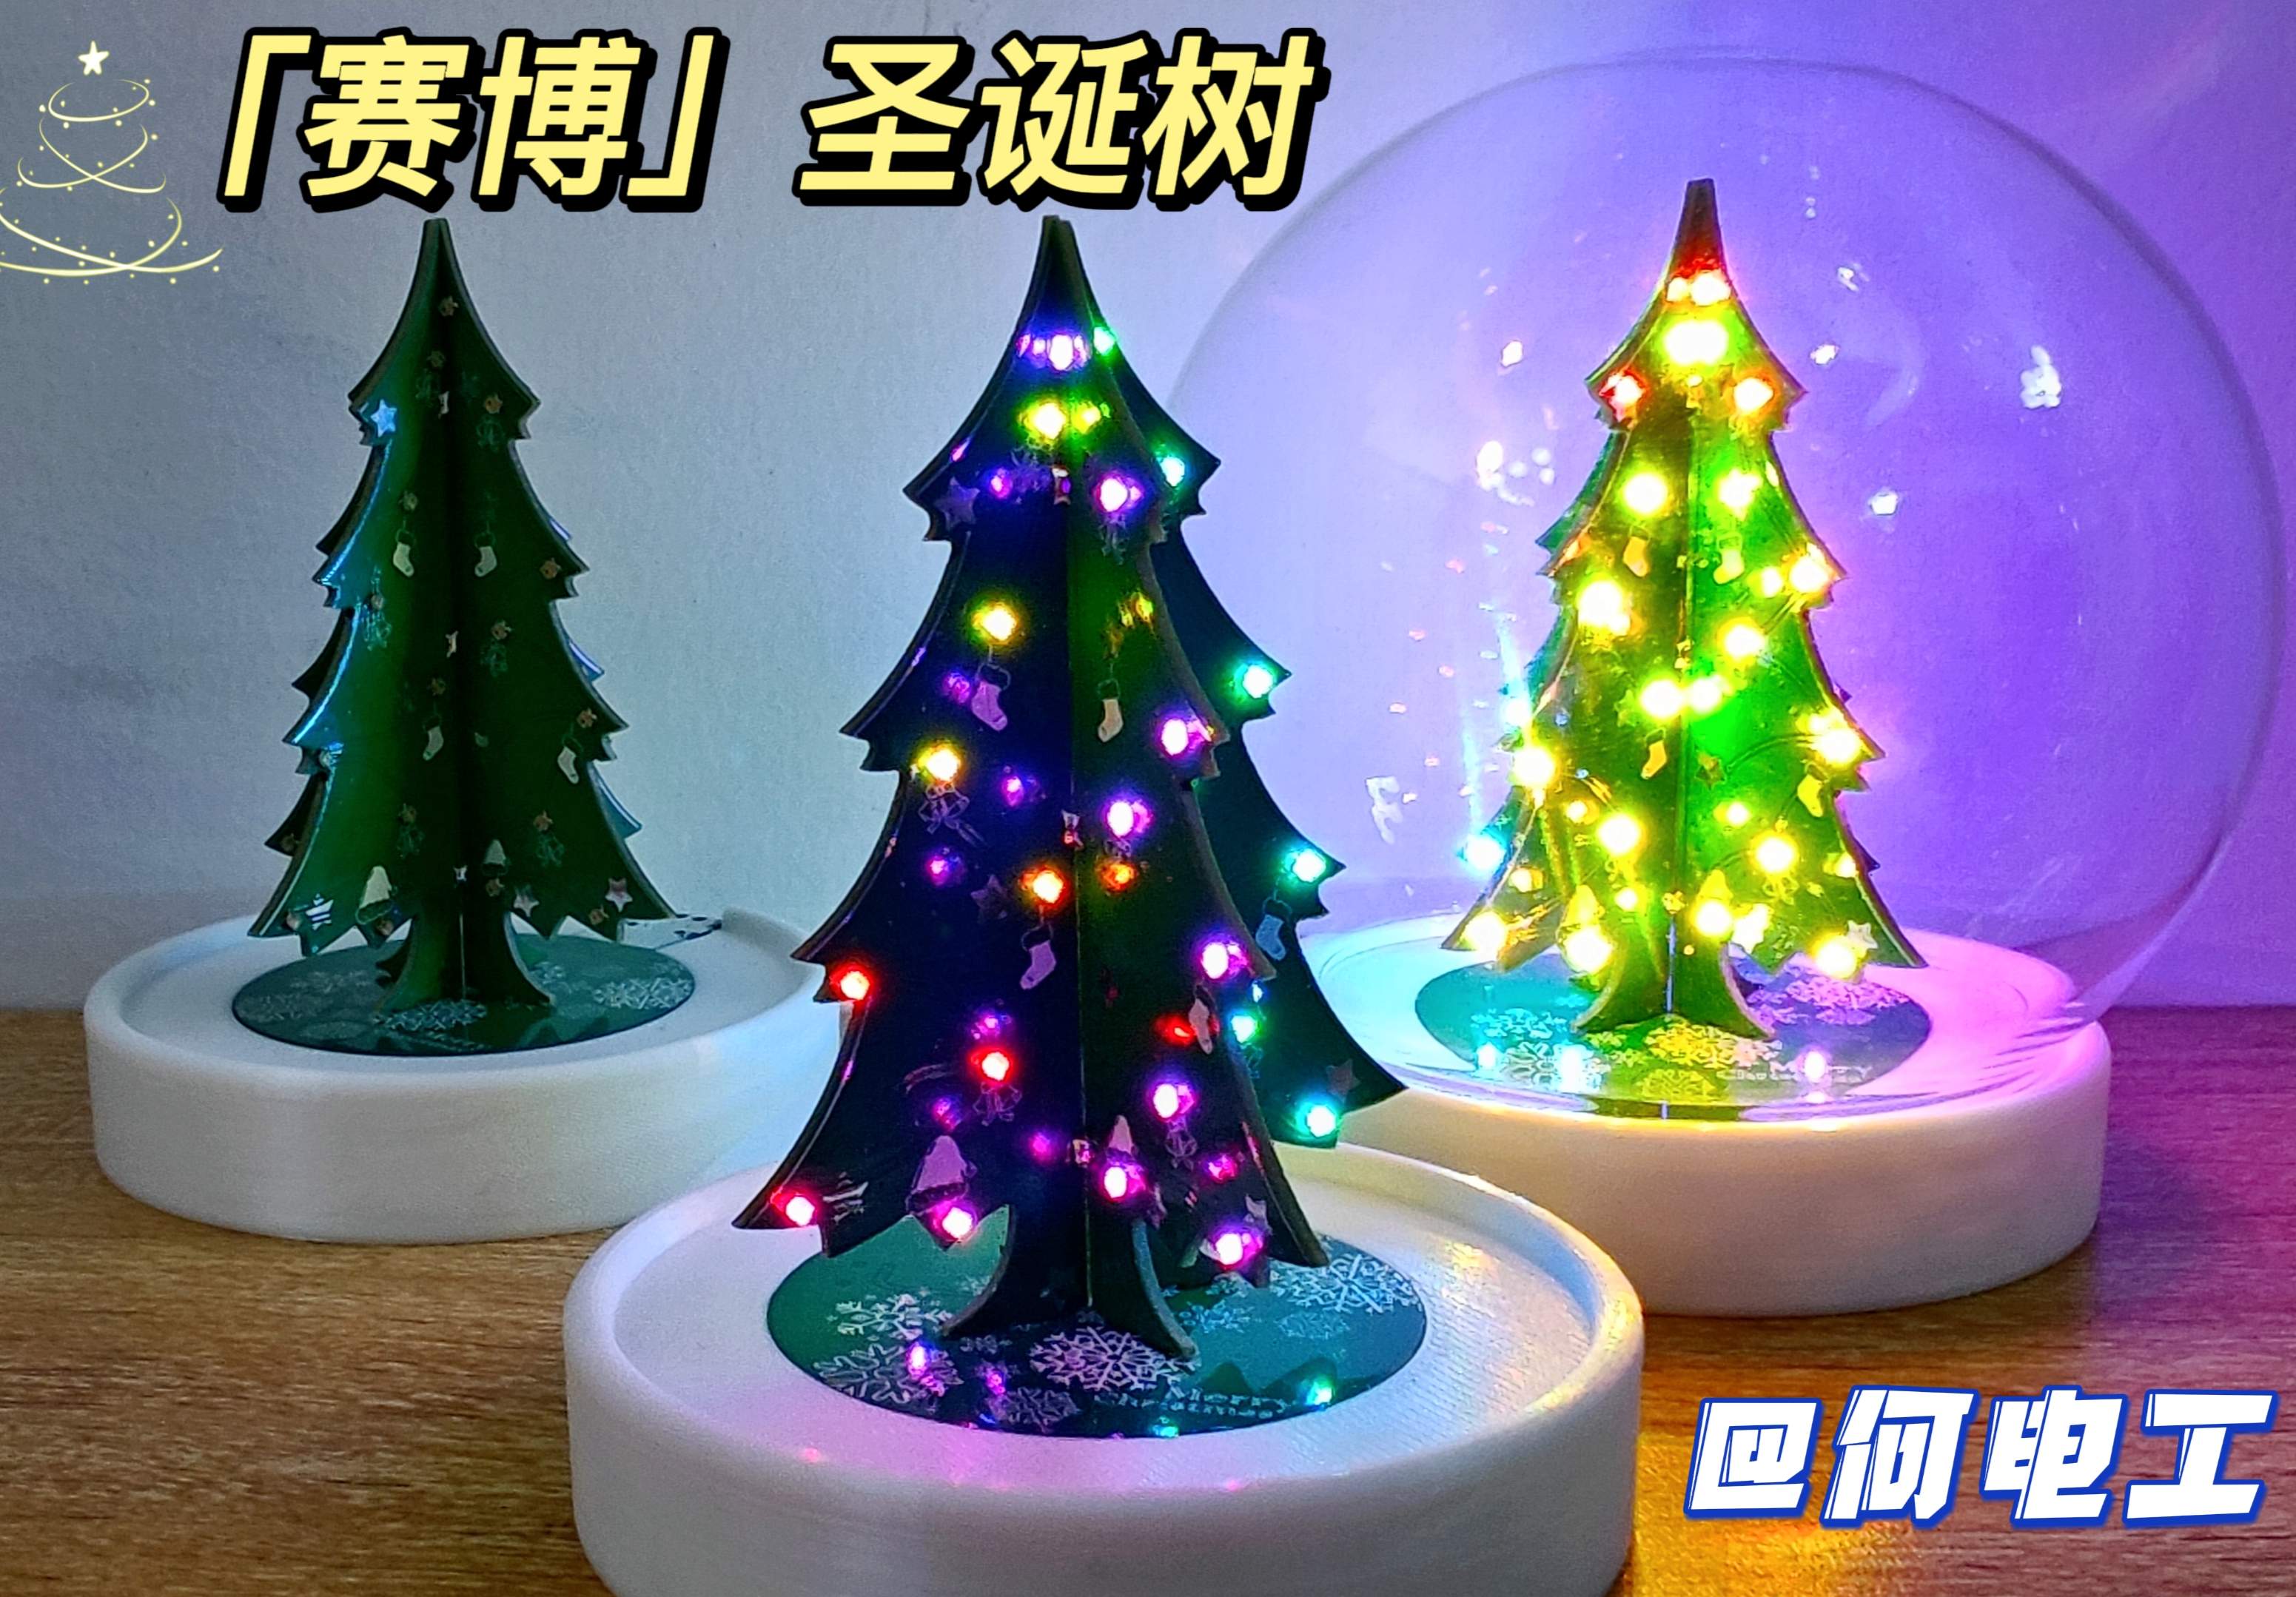
By using 1010 packaged WS2812 lamp beads, a mini Christmas tree with harmonious overall look and feel and better viewing angles can be achieved.
It adopts battery power + touch switch + mobile phone remote control solution, focusing on an elegant.
Main Features
1. Light board part (Christmas tree main body)
Using WS2812 lamp beads in 1010 package, the size is smaller and more harmonious, and the viewing angle is better.
The light board has a unified design, and one free sample (5 PCBs) is enough.
Simplified silk screen printing of lamp beads to avoid screen printing affecting the look and feel of the Christmas tree.
Use arc-shaped signal traces to integrate the traces into the design and not appear obtrusive.
2. Control part (Christmas tree base)
Achieve rich lantern display effects through Bluetooth controller, and also reduce the development cycle.
Try to avoid front-facing wiring to improve the overall look and feel.
The charging interface, switch buttons, and indicator lights are all rear-mounted and bottom-mounted.
Achievements Display
Physical display video: [Bilibili] Plant a cyber Christmas tree.
You are also welcome to follow my Bilibili account @何电工.

If you plan to copy this project, welcome to join my technical exchange QQ group: 1016193632.
Circuit Design
The circuit adopts modular design
The first is the Type-C interface and charge and discharge management chip, which realizes battery power supply and one-button power on and off.
For the circuit, you can refer to another of my open source projects:

Because I have some obsessive-compulsive disorder when designing, I chose to put the charging interface, switch button, and indicator light three-piece set at the back. And because the main control board of this project uses all the components on the back ( improve the aesthetics of the front), so I designed a unique laminated structure to achieve.
The structural design here is quite special, so the welding method of this part is specifically explained at the end of the open source project.
In order to perform the switch operation more elegantly, this project uses a touch switch.

The touch sensing chip uses the commonly used 223 chip.
The pull-up resistor is used to set OLH to a low-level output, thus simulating a button and pulling the KEY pin low to control the LY3205 charge and discharge management chip.

It should be noted that the touch chip needs to be directly powered by a battery (BAT + network) so that it can be used when the machine is turned off.
Therefore, it is necessary to choose a touch chip with wide voltage and low power consumption. We can check the relevant data according to the data sheet.

At the same time, I added a pad on the back of the touch sensor to facilitate the wiring of the touch sensor to different shells.
The boost circuit uses the commonly used 3608, which will not be described in detail here.

Since this project does not have high ripple requirements and has high circuit volume restrictions, I deleted the voltage feedforward capacitor C7 from the PCB.
Each "leaf" has 8 on the front and back, a total of 16 2812 lamp beads.
4 "leaves" have a total of 16*4=64 lamp beads.
It is first recommended to weld R12-16 for series wiring of lamp beads. If any lamp bead is damaged and cannot be repaired, use spare R17-21 for parallel wiring of 4 "leaves".

When wired in series, the lamp beads of the entire Christmas tree can achieve continuous changing effects. When wired in parallel, the lighting effects of the four "leaves" are the same.
The light board adopts a design that reuses fixed pins and electrical connections. The light board is fixed with solder and connected to the motherboard at the same time, as shown in the figure below.
Therefore, when welding, be sure to ensure that the solder joints are reliably connected.

The four light boards needed are the same (of course you can draw 4 different ones), and one free proofing (5 PCBs) is enough.
If batch welding is required, "4-panel" can be used, so that one board is "a tree".

The lamp beads of this project use 1010 small packages, which are difficult to weld. Novice welders need to consider whether their welding skills can be successful.
The shell (base) is designed using Fusion360 modeling, as shown in the figure below
The STL file of the base has been placed in the project attachment and can be downloaded and printed by yourself (it has a bevel, but it can be printed without support)

The small hole in the middle of the base is used to fix the microphone on the light controller.
The outer glass cover I chose is 8.5cm in diameter, which is smaller than the conventional glass cover with a diameter of 10cm or above, and is more suitable as a desktop ornament.
The mini size of the Christmas tree is also designed to fit this small lampshade, making it appear more delicate.

Of course, you can also choose a larger lampshade and change the base.
Software Part:
Software download address:
https://faqsys.magichue.net:4489/download/zgble_download.html?tpn=1703399124066
Software FAQ:
In the software, set the number of points to 64 and the number of segments to 1. If connected in parallel, set the number of points to 16 and the number of segments to 4.
On the home page of the control interface, you can display the lamp beads in a single color and determine whether the RGB value is correct. If the color of the lamp beads is different from the software setting, you need to modify the light bar sorting (the default is RGB, and the corresponding setting here is GRB , using lamp beads from different manufacturers may require different settings)

Production Notes:
All boards in this project are made 1mm thick!
1. Weld the charge and discharge management and boost circuit first, and then weld the light board after confirming that the charging and boost output are OK.
2. After the light panel welding is completed, be sure to confirm that each light panel can be lit normally before proceeding with assembly and welding.
3. When welding the light board, you must first weld the connection pads between the light boards, and then weld the connection between the light board and the main control board.
4. You can use foam tape to stick the battery to the back of the main control board, and then use metal pins to connect the WS2812 expansion board.
Charging Interface Welding Method:
First, bend the two front support pieces of the Type-C interface, and then use solder to fix the bent support pieces to the interface body.

When welding, first weld the buttons and lamp beads. After welding, it is recommended to use a soldering iron to add more solder to ensure that the buttons are fixed reliably.

Then use a soldering iron to tin the Type-C signal pin part, and then use a heat gun to heat and solder the Type-C interface from the back.

After soldering the above steps, first make sure the charging function is normal.
Finally, we can solder the four fixed pins of the Type-C interface.
Control Board Welding Method:
First, weld the main control board and light board, connect the flying wires to the main control board, and use the battery or power supply to test that the lighting function is normal.
Then use sponge tape (thick double-sided tape) to fix the battery in the middle of the bottom of the Christmas tree.

Find some hard component pins and bend them into a C shape according to the thickness of the battery.
Solder the bent pins to the control board and trim them.

Finally, weld the lighting Bluetooth control board and the Christmas tree main control board together.

It is recommended to test again after all connections are completed. After the test is completed, it can be put into the shell for assembly.
During installation, adjust the lighting Bluetooth control board so that the microphone is aligned with the bottom hole.
Purchasing Link:
Just follow the circuit diagram to purchase the main components.
The WS2812 controller I used is the "USB Symphony Controller" module in the following link.
If you need to buy WS2812-1010 lamp beads in bulk, you can choose.
The diameter of the glass lampshade is 8.5cm, you can purchase the lampshade separately.
The battery is a finished soft-packed lithium battery with a protective plate, size 602030.
Special Thanks To:
Thank you @Trista for your continued support and encouragement.
Thanks to @活动酱 for proposing a design with built-in speakers. Considering that the current cycle of this project is relatively tight (it will be released before Christmas), and I currently have no experience in the design of audio circuits, I will release this version first and the improved version will be released soon. Publish later (makes an old dove sound)
Other:
2024/05/21 Update Notes: Fixed the connection problem of signal link 2 (backup line)
If you have any questions or suggestions about the project, please leave a message for discussion.
You are also welcome to join my technical exchange QQ group: 1016193632
Designed by 何电工 (from OSHWHub)
Design Drawing
 Empty
Empty
Comment