

 Completed
IcePad fully transparent macro keyboard
PRO IcePad fully transparent macro keyboard
License
:CC BY-NC-SA 4.0
Description
Can making keyboards also become addictive?
The world of keyboards is really big, full of wonders.
The world of transparent keyboards has two heavyweight designs, one is the Centerpiece and the other is the fluxkeyboard.
If there are other similar products, it only shows that I still have room for improvement 😓, I have to understand it well.
The former uses Gadalon's transparent mechanical axis and transparent keycaps to achieve transparency, with good mechanical touch; the latter uses magnetic levitation, with even more pleasing results, after all, the display part is almost unobstructed.
Both of these plans are very impressive, and I am very grateful for their continuous innovation and exploration in new fields.
However, so far no one has got the mass production machine trial, can only be a little imagination of the two.
I currently have several full keyboards in my hand. Although they are not expensive, they have not reached the point of being scrapped. I can only wait and see for now.
But as a DIY enthusiast, how can you look from afar? You must DIY a transparent macro keyboard that belongs exclusively to you.
Thanks to current 3D printing technology, making a transparent magnetic levitation keyboard is much more convenient than before.
The advancement of technology has accelerated the pace of dreams becoming reality.
Keyboard this thing, enough is good, pure personal needs, then come to a 6️⃣6️⃣6️⃣ six keys;
Note: This is a purely personal DIY project driven by curiosity. It has undergone multiple experiments and tests, and the basic version has already met personal expectations. Keep up the good work.
Thank you very much to the friends who have helped during the period (😊).
If you think the project is good, can you give a free like at the end of the 👍 and collection ❤ ?


Open source license
Attribution - Non-Commercial Use - ShareAlike 4.0 International (CC BY-NC-SA 4.0)
Prohibit all forms of unauthorized sales
You are free to:
- Share - Reproduce and publish this work in any medium and in any form
- Deduction - modify, transform or build upon the work
- As long as you abide by the terms of the Licensing Agreement, the licensor cannot revoke your rights.
However, the following conditions must be observed:
- Attribution - You must give appropriate attribution , provide a link to this Licensing Agreement, and indicate whether modifications have been made (to the original work) . You may attribute your name in any reasonable way, but must not in any way imply that the licensor endorses you or your use.
- Non-Commercial Use - You may not use this work for commercial purposes .
- Share Like - If you remix, transform, or build upon the Work, you must distribute your Contribution under the same Licensing Agreement as the original Licensing Agreement .
- No Additional Restrictions - You may not use legal terms or technical measures to restrict others from doing what the Licensing Agreement allows.
- [Making] You can make it yourself according to my design.
- [Giving] You can give away the keyboard based on my design to your relatives and friends for free.
[Sale] If you want to sell this work or derivatives based on this work, please contact me in advance. For those who are going long and plan to sell for the purpose of making a profit, please contact me in advance.
Software part
Temporarily consider using Python scripting language implementation, using CircuitPython , later consider other frameworks;
Currently using CPY 9.x version, can refer to some source code for custom modifications, no need to endure the suffering caused by various installation environments.
Some examples of functions:
The code for the album section is very simple
As shown below, the way to change the album is to transfer the pictures to the photo folder.
import boardfrom adafruit_slideshow import PlayBackOrder, SlideShow
display = board.DISPLAY
slideshow = SlideShow( board.DISPLAY, None, folder="/images/photo/", loop=True, order=PlayBackOrder.ALPHABETICAL, dwell=2,)
while slideshow.update(): pass
How to customize your own macro keyboard
Mainly achieved by modifying files. Each file can have 6 magnetic levitation buttons and an encoder switch. Rotating the is mainly used to switch between different macro configuration options.
If the operation of a software exceeds 7 limits, you can redefine a file, continue to add the remaining icons, or customize them.
Hardware part
The key press is mainly achieved by the adsorption of magnets, and the signal emitted by the key movement is received by the Hall sensor on the PCB
Basic configuration:
- ESP32-S3 8MB FLASH
- 2.8 inch IPS LCD,
- A vibration motor
- EC11 rotary encoder
- Colorful LED light strip
- 6 buttons
Note: When installing the magnets on the buttons, it is necessary to pay attention to the polarity of the magnets and install them using mutual exclusion. The magnets on the frame need to be installed using attraction according to the magnets on the transparent buttons.
Firmware burning
How to burn firmware
Mainly use Yue Xin's tools > flash download tool < click me
Install as shown in the figure below
- Before powering on, keep pressing the , then power on, and you will hear the Facility Management prompt detect the sound of the com port, release the button
- Open the tool and set it as shown in the picture.
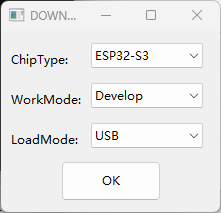
Pay attention to the red box in the upper left corner of the picture below. Be sure to select it in order to successfully burn.
The COM number can be selected according to the specific port of the Facility Management.

BOM
In addition to the component bom table exported using LCEDA's PCB, the components in the following table also need to be purchased.
| Name | Number | Remarks | Picture |
| 2.8 inch screen | 1 pc | Purchase link, the current shell is only compatible with the model of this link (other brands have not been tested, and problems may need to be solved by yourself, such as size, driver, etc.) |  |
| Magnet: D6 * 1mm round | 20 pcs | Axial magnetic type |  |
| Magnet: D2 * 2mm round | 8 pcs | Axial magnetic type |  |
| Countersunk head and flat tail self-tapping screws: M1.6 * 6 | 1 pc | ||
| Countersunk head and flat tail self-tapping screws: M1.7 * 16 | 2 pcs | ||
| 3D printed parts | 1 set | See the DOC documentation column for details. |  |
| PVC panel (optional) | 1 pc | Just use the attachment at the end of the article to place an order on JLC |  |
DOC
Please check carefully to solve the problem, most likely it is a welding problem The components on the board are still easy to solder, not too much, and should not encounter too many soldering problems.
💜 For problems outside the document, I may not know how to solve 😔, so try to learn to search and rely on personal solutions 3D printing can also be found here, and there are already models adapted to various brands -----> document, click me <-----


Demo
Detailed feature demonstration can refer to here.
https://www.bilibili.com/video/BV17ASMYmEbC/
Designed by M0dular (from OSHWHub)
Link:https://oshwhub.com/kakaka/icepad-full-transparent-macro-keyboard
Design Drawing
 Empty
Empty
Comment