

 Completed
ESP32 direct dialogue large language model AI voice assistant
PRO ESP32 direct dialogue large language model AI voice assistant
License
:GPL 3.0
Description
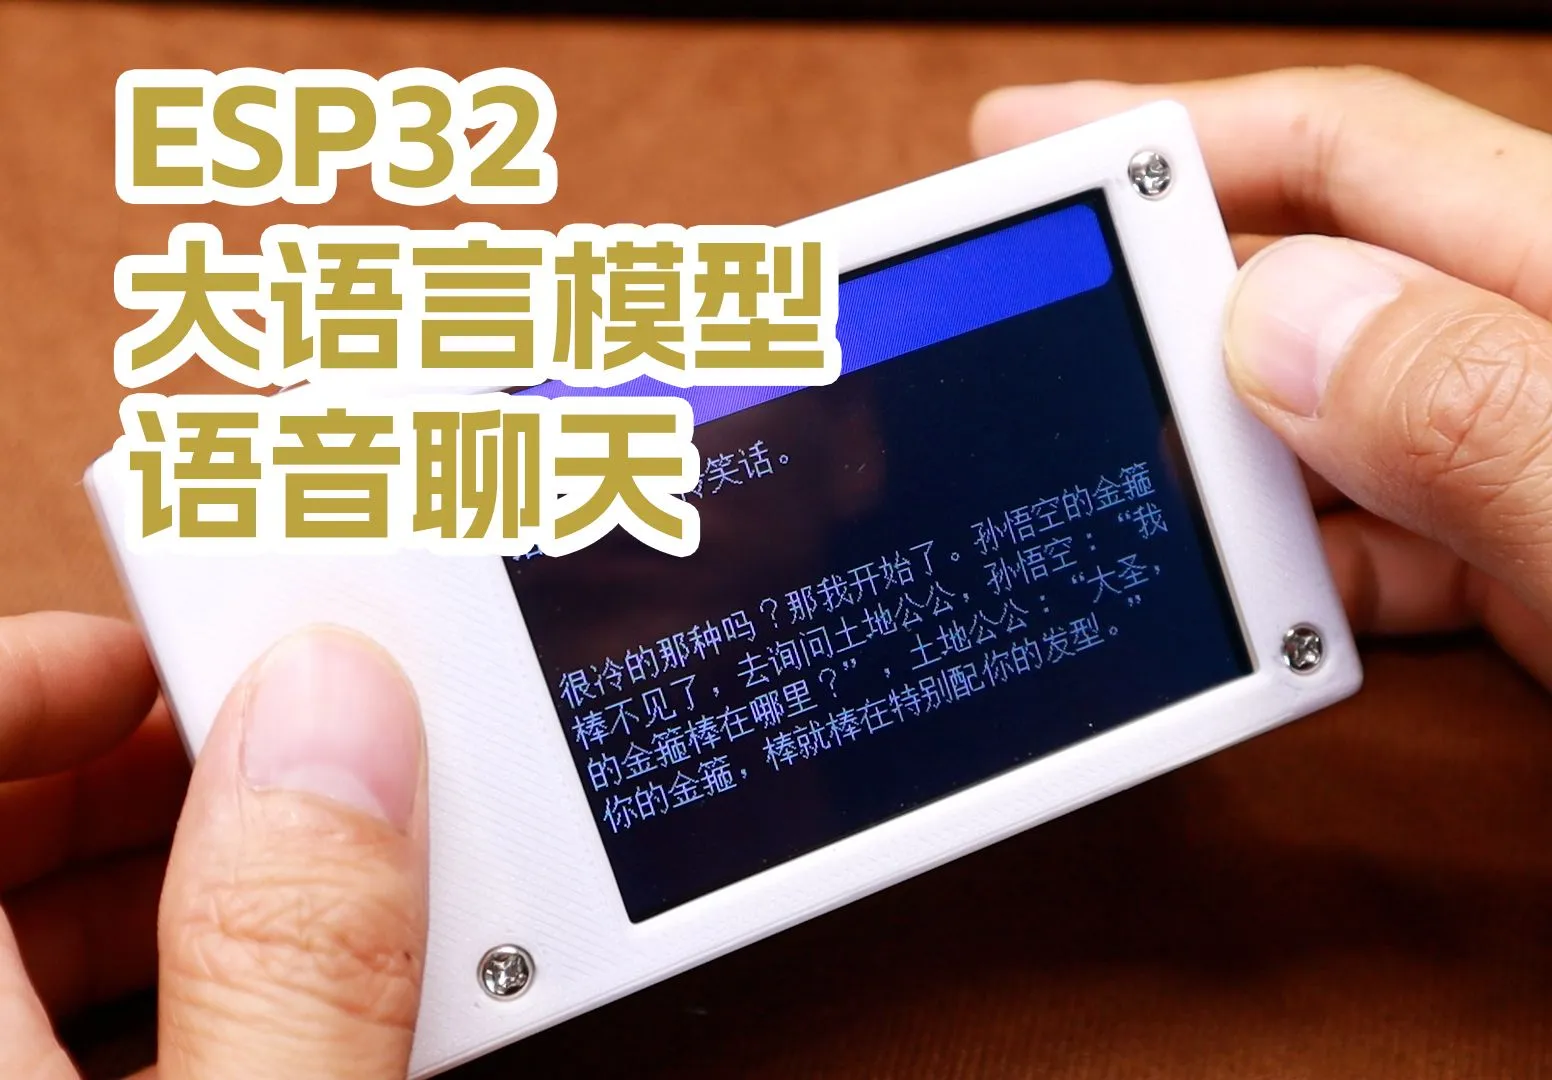
ESP32S3 uses the INMP441 to receive the voice, sends the pcm audio data to the STT speech recognition service to convert it into text, then sends the text to the large language model API to ask questions, and finally sends the answered text to the TTS speech synthesis service, and plays the audio through the MAX98357A, and uses the TFT touch screen to display it interactively in the process.
Video link: https://www.bilibili.com/video/BV1F1421k7Sv/?vd_source=922712da2bcef8666165702c88f19f89

The project was originally a derivative project of making an ESP32 playback MP3 player. I thought that since I could play it, I could also record it, so I continued to make this simple gadget that uses ESP32 for audio processing.

In the project, STT language recognition and TTS speech synthesis both use iFLYTEK APIs, and you need to register an iFLYTEK account (https://www.xfyun.cn/) first and receive a trial package to avoid time costs.

The large language model in the project uses the same engine (https://www.volcengine.com/product/ark) as the Volcano Engine, and you need to register an account first, and after receiving a free trial, you can also try it for a period of time.

The above three APIs can be connected to the API normally after obtaining the KEY from their respective official website consoles and modifying the relevant fields in the code, and the WiFi connection information needs to be modified in the code.

Among them, iFLYTEK's service uses webscoket connection API, TTS uses streaming processing, and plays audio while receiving, but the data processing is not rigorous and sometimes errors occur and have not been solved, please check and modify it yourself.
The volcano engine uses HTTP to connect to the API (because the volcano's webscoket is really not tuned, so I didn't learn it and laughed at it), and it didn't do the streaming, and the reaction time was partially wasted here.
STT also uses webscoket connection but doesn't use streaming (lazy), saying short sentences doesn't have any effect, and sending long sentences is a part of the time wasted here.
The director was only a shallow learner, and reluctantly integrated some basic knowledge to make this idea come true, and the code was for the reference of fellow newcomers, and the master laughed it off.
If you intend to reproduce this project, please be sure to download the source code for compilation and testing, and then try to reproduce it.
The compilation environment is as follows
Compiler software:ArduinoIDE 2.3.2
SDK: ESP32 SDK 2.0.13 (Download in Board Management)
Use the main library: TFT_eSPI 2.5.43 (download in Library Management),
U8g2_for_TFT_eSPI (download link:https://github.com/Bodmer/U8g2_for_TFT_eSPI)
Development Board Settings:

The attached source package contains a Base64_Arturo repository that needs to be copied to the libraries/ directory first.
The two resistors R38 and R39 on the motherboard are used to control the GAIN interface of the MAX98357A module to pull up and down, and only one of them needs to be soldered or none of them. Do not weld two at the same time, it is important to note that the default suspension is not welded.

GAIN pin function:
GAIN is, well, the gain setting. You can have a gain of 3dB, 6dB, 9dB, 12dB or 15dB.
- 15dB if a 100K resistor is connected between GAIN and GND
- 12dB if GAIN is connected directly to GND
- 9dB if GAIN is not connected to anything (this is the default)
- 6dB if GAIN is connected directly to Vin
- 3dB if a 100K resistor is connected between GAIN and Vin
The pin settings of the TFT-espi:
#define ILI9341_DRIVER
#define TFT_WIDTH 320
#define TFT_HEIGHT 240
#define TFT_MISO 19
#define TFT_MOSI 4 // In some display driver board, it might be written as "SDA" and so on.
#define TFT_SCLK 5
#define TFT_CS 16 // Chip select control pin5
#define TFT_DC 6 // Data Command control pin
#define TFT_RST -1 // Reset pin (could connect to Arduino RESET pin)
#define TFT_BL 7 // LED back-light
#define TFT_BACKLIGHT_ON HIGH
#define TOUCH_CS 15 // Chip select pin (T_CS) of touch screen
About the components:
ESP32S3 module selection: S3-WROOM-1-N16R8 version The connection I used: https://item.taobao.com/item.htm?spm=a1z09.2.0.0.54402e8dfVHHff&id=675349632310&_u=o2oqo1kf26cd
INMP441 and MAX98357A use modules, and you can search and buy them directly from Taobao.
The battery plug is a 1.25 pitch positive connector, which only supports a single 3.7V lithium battery, and the TypeC interface has a charging function, which can charge the lithium battery.
Horn: MAX98357A can push 3W horn.
The serial port module is CH340C, and the later generation C needs attention.
Display screen is 3.2 inch with touch screen reference connection: https://item.taobao.com/item.htm?spm=a1z09.2.0.0.54402e8dfVHHff&id=643516677167&_u=o2oqo1kfcc57
There is an MPU-6050 gyroscope on the motherboard, which was originally intended to be used for screen rotation and rotation, but this project is not used, and it can be empty without soldering if you don't play.

For other details, look at the video introduction, the director basically does not reply to the message, because I don't know how to answer most of the questions.
Designed by 爆改车间主任 (from OSHWHub)
Design Drawing
 Empty
Empty
Comment