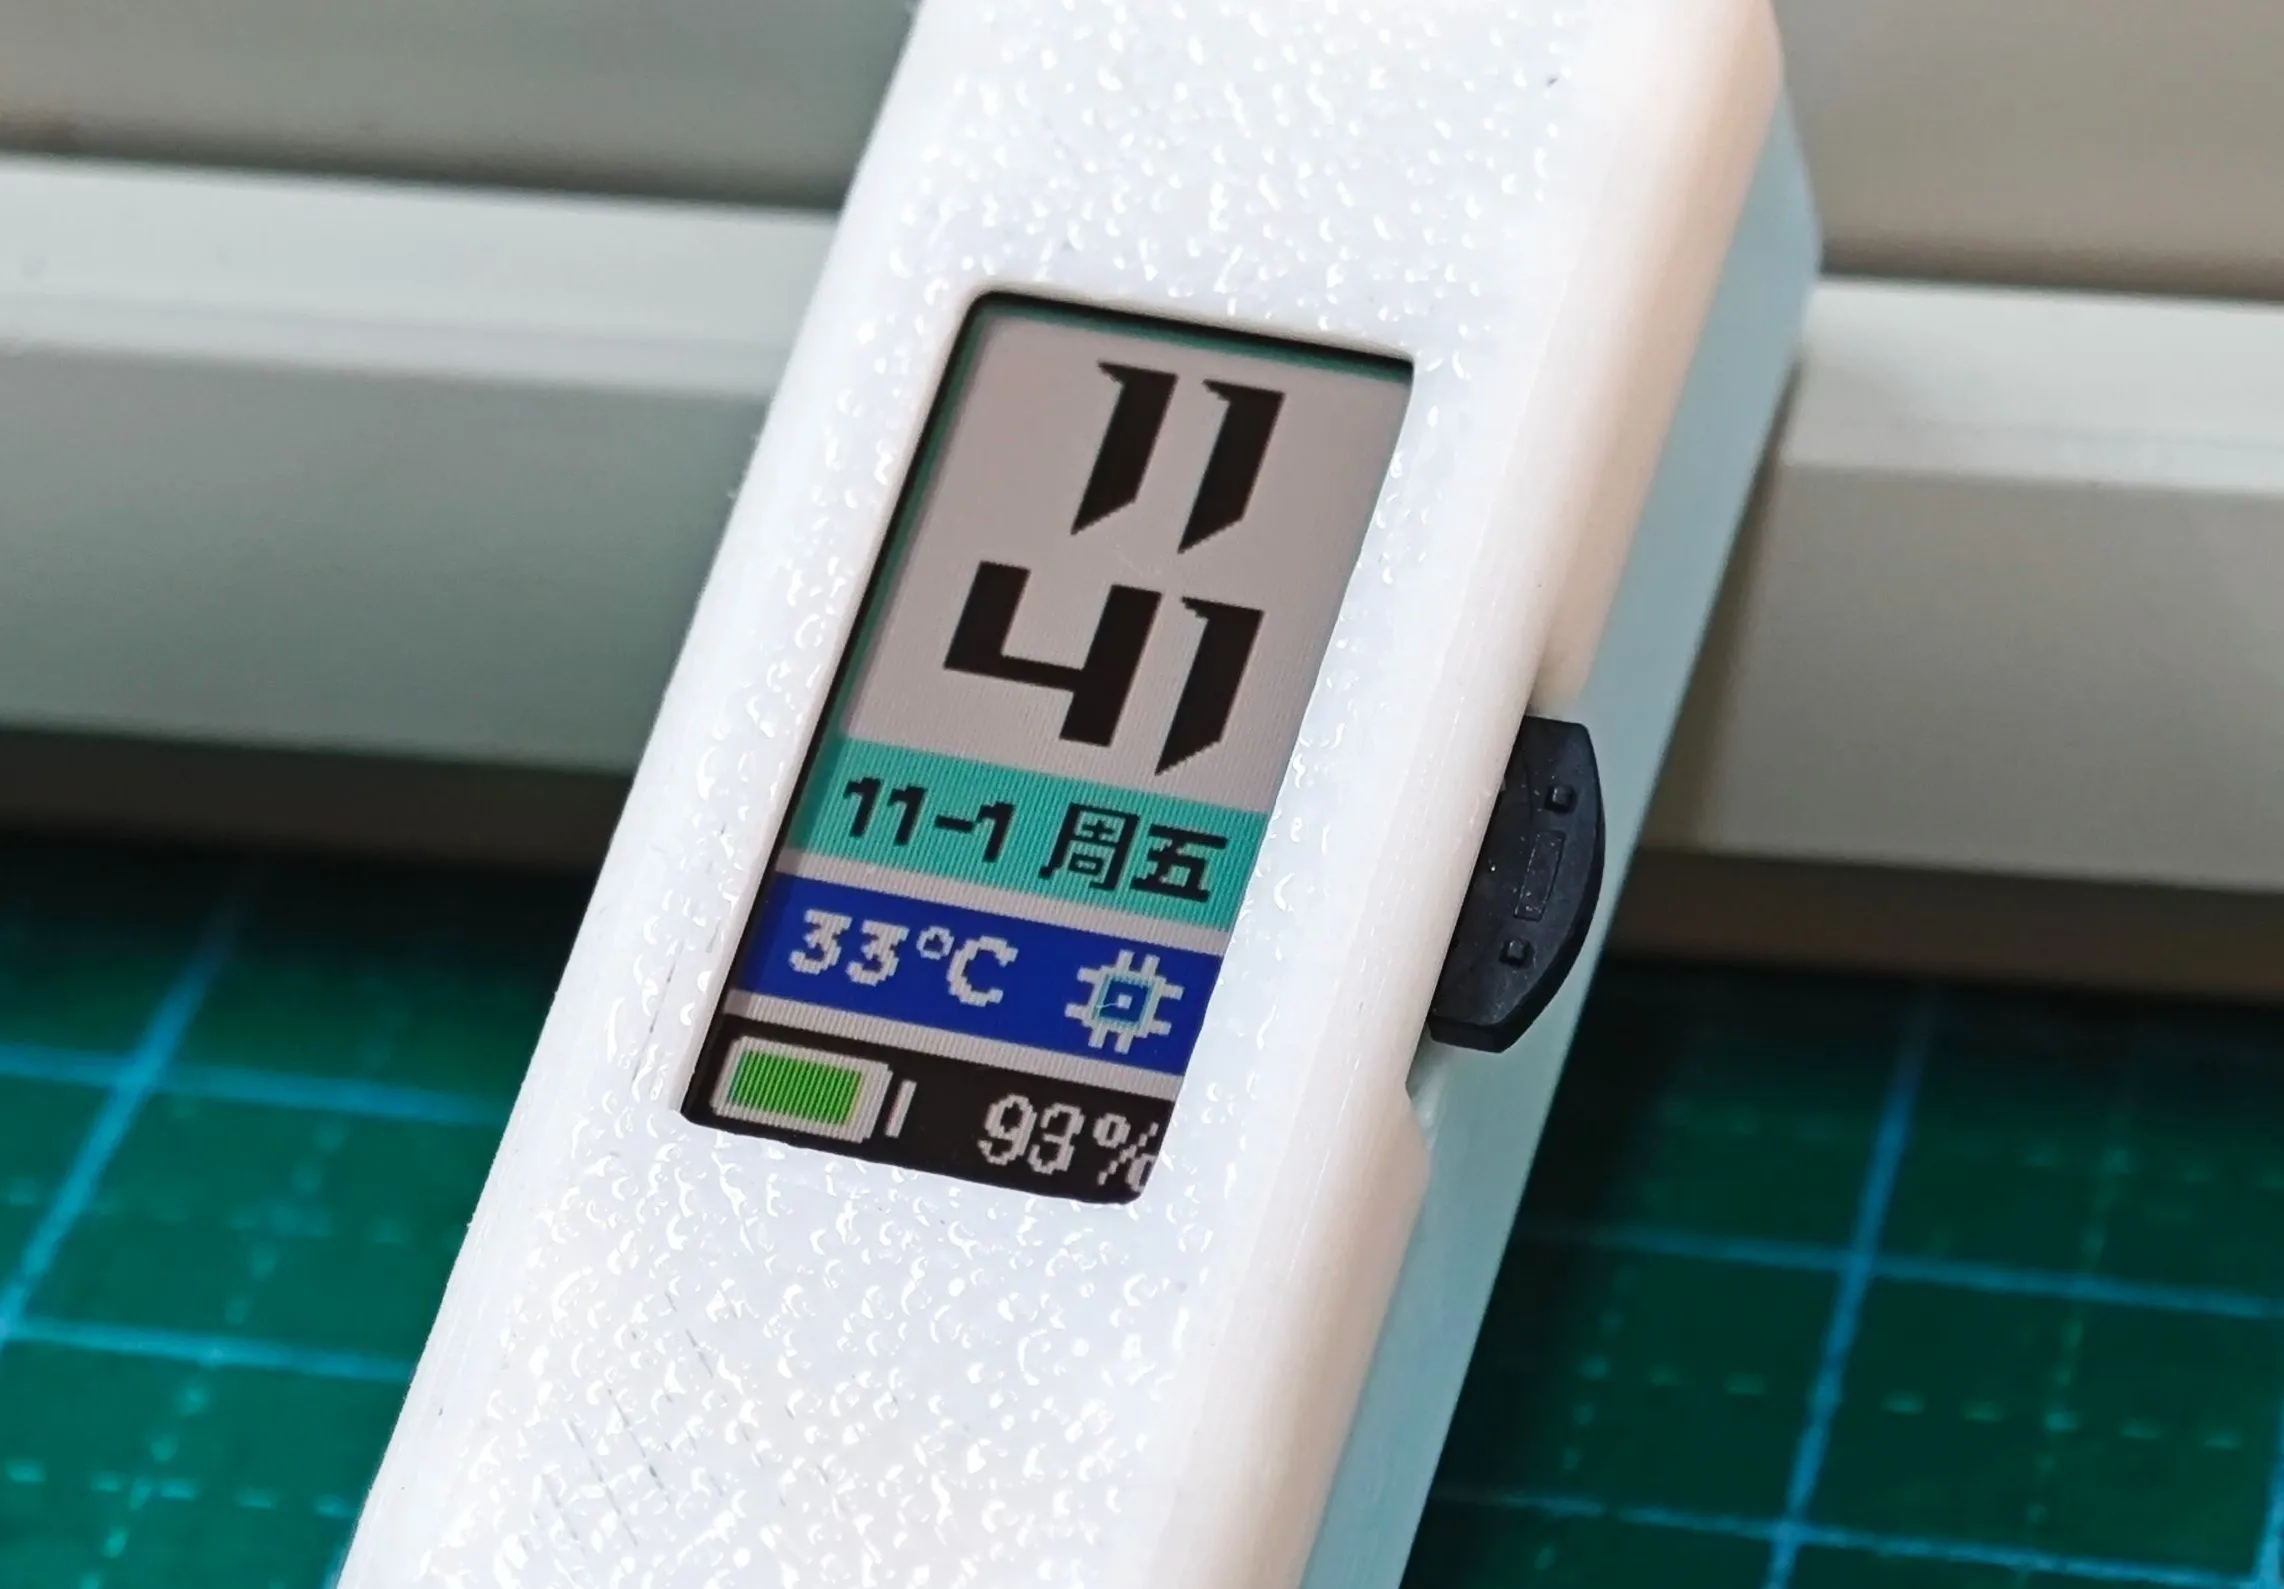
 Completed
Cyber pendant
PRO Cyber pendant
License
:GPL 3.0
Description
- IDE:VScode+platformio
- Frame: Arduino
- Chip: ESP32C3
- GUI:LVGL9
- Screen: JDI Memory LCD keeps power consumption extremely low
- Interaction mode: 3-way dial, ADC partial voltage sampling mode (press and hold for 10 seconds to enter the button ADC calibration when powered on)
- It can be connected to an external expansion module with TYPEC, and currently supports NMEA0183 positioning protocol
- Single-screen backplate linking
- Study notes
- Bilibili video link
- The firmware download address


Precautions for production
- Plate thickness 1.0
- ESP32-C3 should be the version with the suffix FH4, because it comes with 4mb Flash, and the board does not have a Flash chip.
- ESP32-C3FH4 is better soldered with solder paste + heat gun or heating table.
- The dotted end of the screen socket corresponds to the dot of the PCB silk screen.
- Use a heating table or heat gun to solder the ESP32-C3 and the screen socket, and then use a heat gun to blow the accelerometer and fuel gauge up.
- Suggestions for light-curing printing: the upper shell window is too thin and easy to deform, and a harder material is needed.
- FDM printing suggestion: the screw post is easy to break, and it is best to apply some rubber glue to strengthen it.
- Nylon printing suggestion: Printed two sets, one with seams on the upper shell and one normal, nylon is recommended.
Enclosure installation steps
1. Install the printed lever.
2. Install the screen, and if you can't put it, use a blade to scrape the corners around the screen card position.
3. Install the screen bracket and PCB.
4. Install the battery bracket and battery (4 types of battery bracket print a suitable one by yourself)
5. The upper and lower shells are assembled with screws, 4pcs PA1.0x3mm.

Other materials (no advertising ingredients)
- 501430-210 mAh
- PA1.0x3mm screw
- 2.4G antenna
- Buzzer
- Three-way dial FT-007
- AXE510127D Zako
- The bare screen has been poured out, and now only the encapsulated screen with backlight touch is left (the interface has not yet been adapted)


About Expansion Modules
Still use the battery management board to pick up the garbage, remove the BQ24074 chip on it, and make a module with TYPEC with communication and battery management (open after the module is perfected),
Then the flying line plus each functional module, plus the shell can form a different module, using the TYPEC interface to communicate with the host.
Thanks to the battery management, the module can be supplied independently, so that the host's measly 200mAh power is not required.
At present, the implementation of satellite modules is NMEA0183 protocol.
If you make the module yourself, connect the TX of the module to the DP of the main control typec, and you need to share the ground.
Left: One-piece, Right: Split


Project properties
This project is the first public and is my original project. The project has not won an award in another competition.
This project does not disclose the source code, but provides a configured source code with the LVGL framework.
This project is a power generation for love, no activation code is required, no authorization is required, and the source of the mark to be sold can be made.
Burning instructions
The empty chip will be disconnected all the time when it is powered on, ignore it, and just burn it directly.
Note that since Win7 does not come with a WinUSB driver, please upgrade to Win8 or above, or go to the Espressif Manual to install the driver.
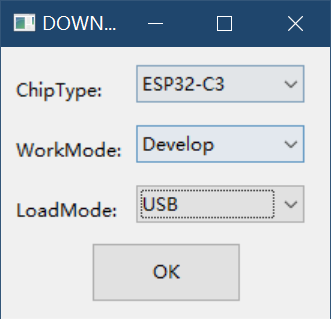
1. Select ESP32-C3, USB mode.
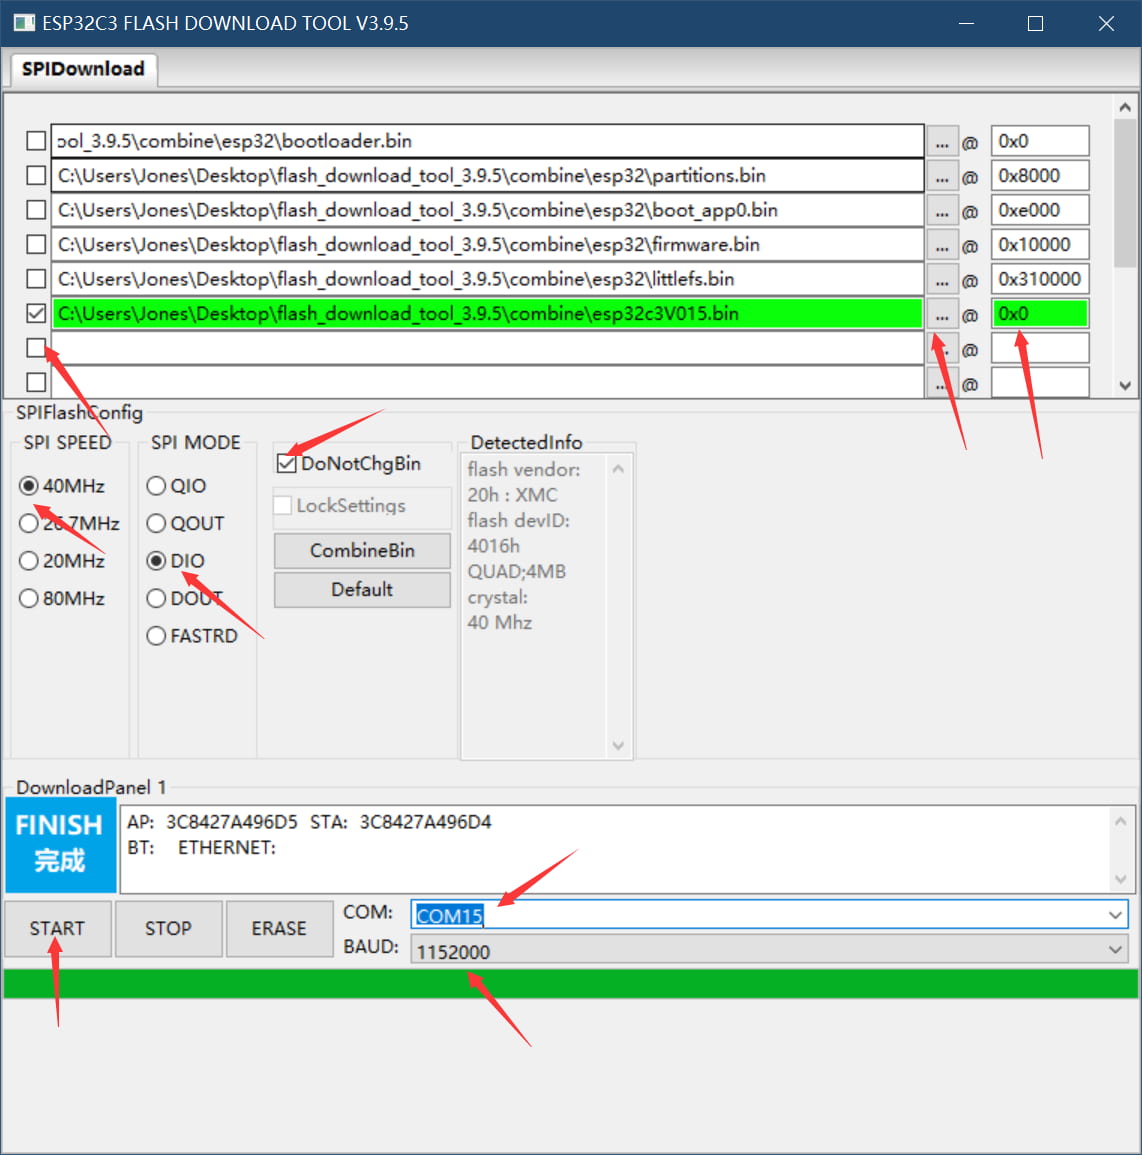
2. Select the path, remember to tick, burn the address 0x0, note that it is zero fork zero, not European fork Europe.
3. Choose the com port, and if you don't have it, click it a few more times.
4. Select the baud rate and pull it up directly.
5. Click START to start, and click a few more times if it fails.


If the programming is successful, you will enter the button calibration interface when you turn it on for the first time.
Project progress
- Software
- LVGL9
- Clock (available for one month)
- Alarm clock
- Accelerometer, goniometer, raise your hand to wake up.
- WEB Networing
- File Manager
- Settings menu
- NMEA0183 positioning information reading, simple code table
- Customize the ringtone
- Customize hibernation wallpapers
- Customize low battery wallpapers
- Memo, clock alternate display, sleep display
- Custom Device Holder (in progress)
- Satellite Calibration Clock (in Progress)
- Serial Air Quality Module Reading (in Progress)
- Hardware硬件
- V0.9 is a released version, except for the buzzer's electromagnetic interference, other functions are normal.
Hardware design
- Main control ESP32-C3FH4 integrated with 4MBFlash.
- Patch antennas, ceramic and PCB antennas are fine, but they are not impedance matched.
- TYPE-C interface, for external expansion board for charging and programming programs.
- Lithium battery charge management LTH7R/4054
- USB/battery automatic switching circuit, diode + PMOS tube implementation.
- 3.3V-LDO ME6210A33M3G
- Clock RX8010SJ
- Accelerometer that wakes up LIS2DW12TR too sensitive
- Fuel gauge, small capacity battery is not accurate at all, 8 power curve fitting compensation is slightly more accurate MAX17048G
- Three-way wave wheel switch interaction.
- The reset button uses a small side press.
- Use SMD buzzer, triode drive, for playing MIDI music and alarm clock.
Other
Designed by 甘草酸不酸 (from OSHWHub)
Design Drawing
 The preview image was not generated, please save it again in the editor.
 Empty
Empty


Comment