

 Completed
X eliminator
PRO X eliminator
License
:GPL 3.0
Description
Bilibili video: Click to play
Winter is coming, the small animals begin to hibernate, the snow begins to fall, the smell of the year is getting stronger, and static electricity is also rampant.
Today I'm going to be a dragon slayer warrior and eliminate static electricity! That's how the static eliminator was created.


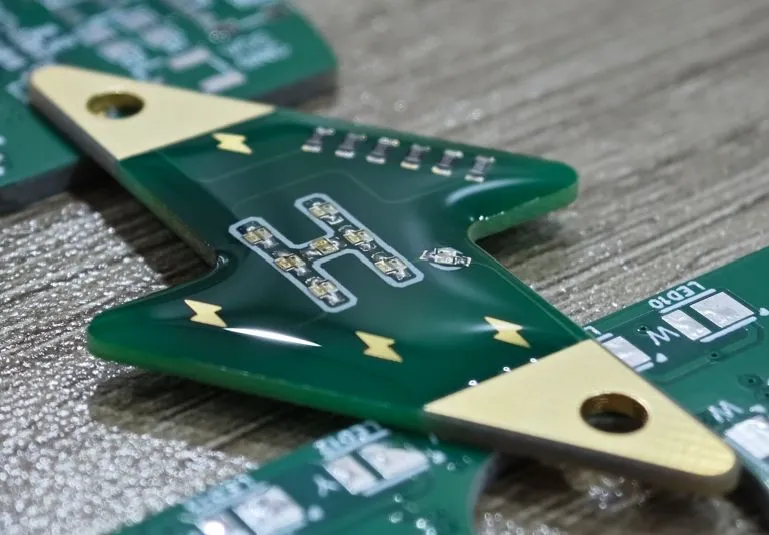
It has two main functions, eliminating static electricity and indicating the direction of the electrode. Among them, there is no direction to eliminate static electricity, and static electricity can be eliminated by any way you take it; The direction of the indicator electrode is divided into directions, and the "" of H is "." The location is the electrode currently displayed.
In the image below, "." Underneath, red is displayed, so underneath is the positive electrode, which is positively charged.

In the image below, "." On the top, it is shown in blue, so the top is the negative pole, which is negatively charged.

It works by shifting the discharge tip so that people don't feel like they're being shocked.
The hardware consists of two sets of LEDs connected in parallel in reverse and a series of current-limiting resistors.
It should be noted that the two groups of LEDs must be connected in reverse parallel and act as each other's clamping diodes; The resistance can not be simplified with a resistor with the same resistance value, the resistance here is not to increase the resistance value, but the withstand voltage of the 0603 resistance is not enough, and the voltage division is connected in series, so that a resistance will not bear too much voltage.
My board is reverse soldering two 0402 LEDs on a 0603 pad, which is more difficult to solder.
Due to my welding method, the actual product is somewhat different from the schematic, so you can solder according to the schematic diagram when you buy an electrode LED. Be sure to pay attention to the positive and negative poles of the lamp beads, welding errors will lead to the indication of the wrong polarity, and the polarity of the two sides is not the same. The LED orientation is like this, and the electrodes touched by the finger are the red positive electrode and the blue negative electrode, which are the same on both sides.

You can buy Polar LED, this kind of lamp bead is reversely encapsulated with two LEDs on a 0603 substrate, which can greatly reduce the difficulty of welding.

After the welding is completed, a layer of UV glue needs to be sealed to further improve the withstand voltage of the resistor, and the appearance is good-looking, the most important thing is that it will not be sealed, even if the eliminator is used, the resistance will still be electrified if you accidentally touch it.
Attention should be paid to the sealant, not UV glue can not be sealed to the pad, only the green part can be sealed.

Remember to use the immersion gold process to proof, there are heavy metals in tin spraying, even if there are other heavy metals in lead-free tin spraying, immersion gold is good-looking and safe, but also anti-oxidation, and the most important thing is that immersion gold can also be proofed for free.
OK, that's it, thank you all for reading, and have a good life, no static electricity.
Designed by 月亮管理员小胡 (from OSHWHub)
Design Drawing
 Empty
Empty
Comment