

 Completed
Cyber signature, electronic signature holder
PRO Cyber signature, electronic signature holder
License
:GPL 3.0
Description
Designed and produced an electronic sign holder, built-in Guanyin spirit sign 100 sticks, ultra-low power consumption design, small size (about 40mm*12mm*8mm), can be used as a key pendant. Operation method: Draw lots by shaking (shaking), check the content of the signature by touching, press and hold to turn off the phone, and draw lots again. For more information, see the demo video.

Open Source Address: https://oshwhub.com/daodaochu/cybersign
Video Demo: https://www.bilibili.com/video/BV16DcXekEQQ
1 Hardware design
The hardware schematic diagram of Cyberling's signature is as follows, the main control adopts STM32G031F8P6 single-chip microcomputer, PT2041AT6 or TTP223 touch chip, using 0.87-inch OLED (128*32 resolution), Type-C charging port.

A simple shell was initially designed in LeadEDA, and the shell was exported in .step format, and then further edits were made in solidworks. So the final shell is not this version in Rietron EDA, and the final version of the shell is available in the open source connection attachment.

Hardware reference links
OLED screen:https://item.taobao.com/item.htm?id=799375073102
Vibroswitch:https://item.taobao.com/item.htm?id=842497038073
Battery301030:https://item.taobao.com/item.htm?id=664956162978
2 Software Design
Software workflow of Cyberling: Vibrate switch to wake up -> lottery display -> long press or timeout system sleep. For details, please refer to the source code of the open source link.
3 Assemble
Assembly Notes:
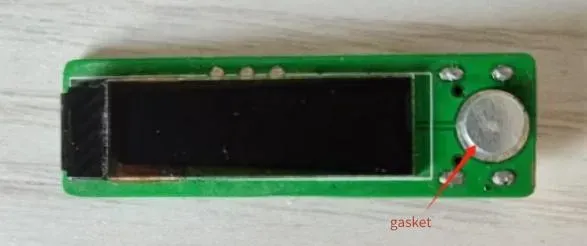
- When assembling, a metal gasket with a thickness of about 1.5mm should be pasted on the touch area, so that the shell is closely connected with the touch area, otherwise the touch function is not good.
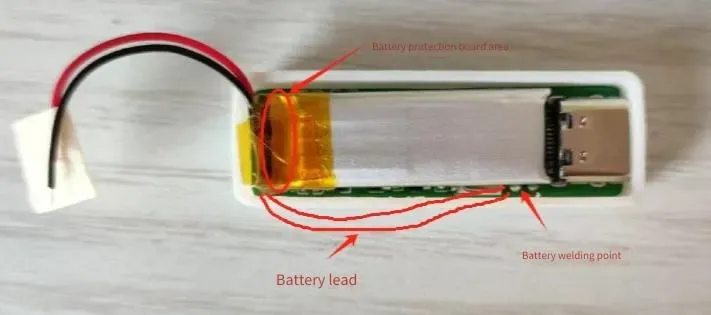
- Pay attention to the direction in which the battery is placed. The place where the battery protection plate is on the thick side, if the direction is wrong, the back case cover is not tight. In addition, as shown in the figure, the wire should be led out from the bottom instead. Tear the tape off the battery, adjust the direction of the wire, and then glue the tape.
Designed by daodaochu (from OSHWHub)
Design Drawing
 Empty
Empty
Comment